
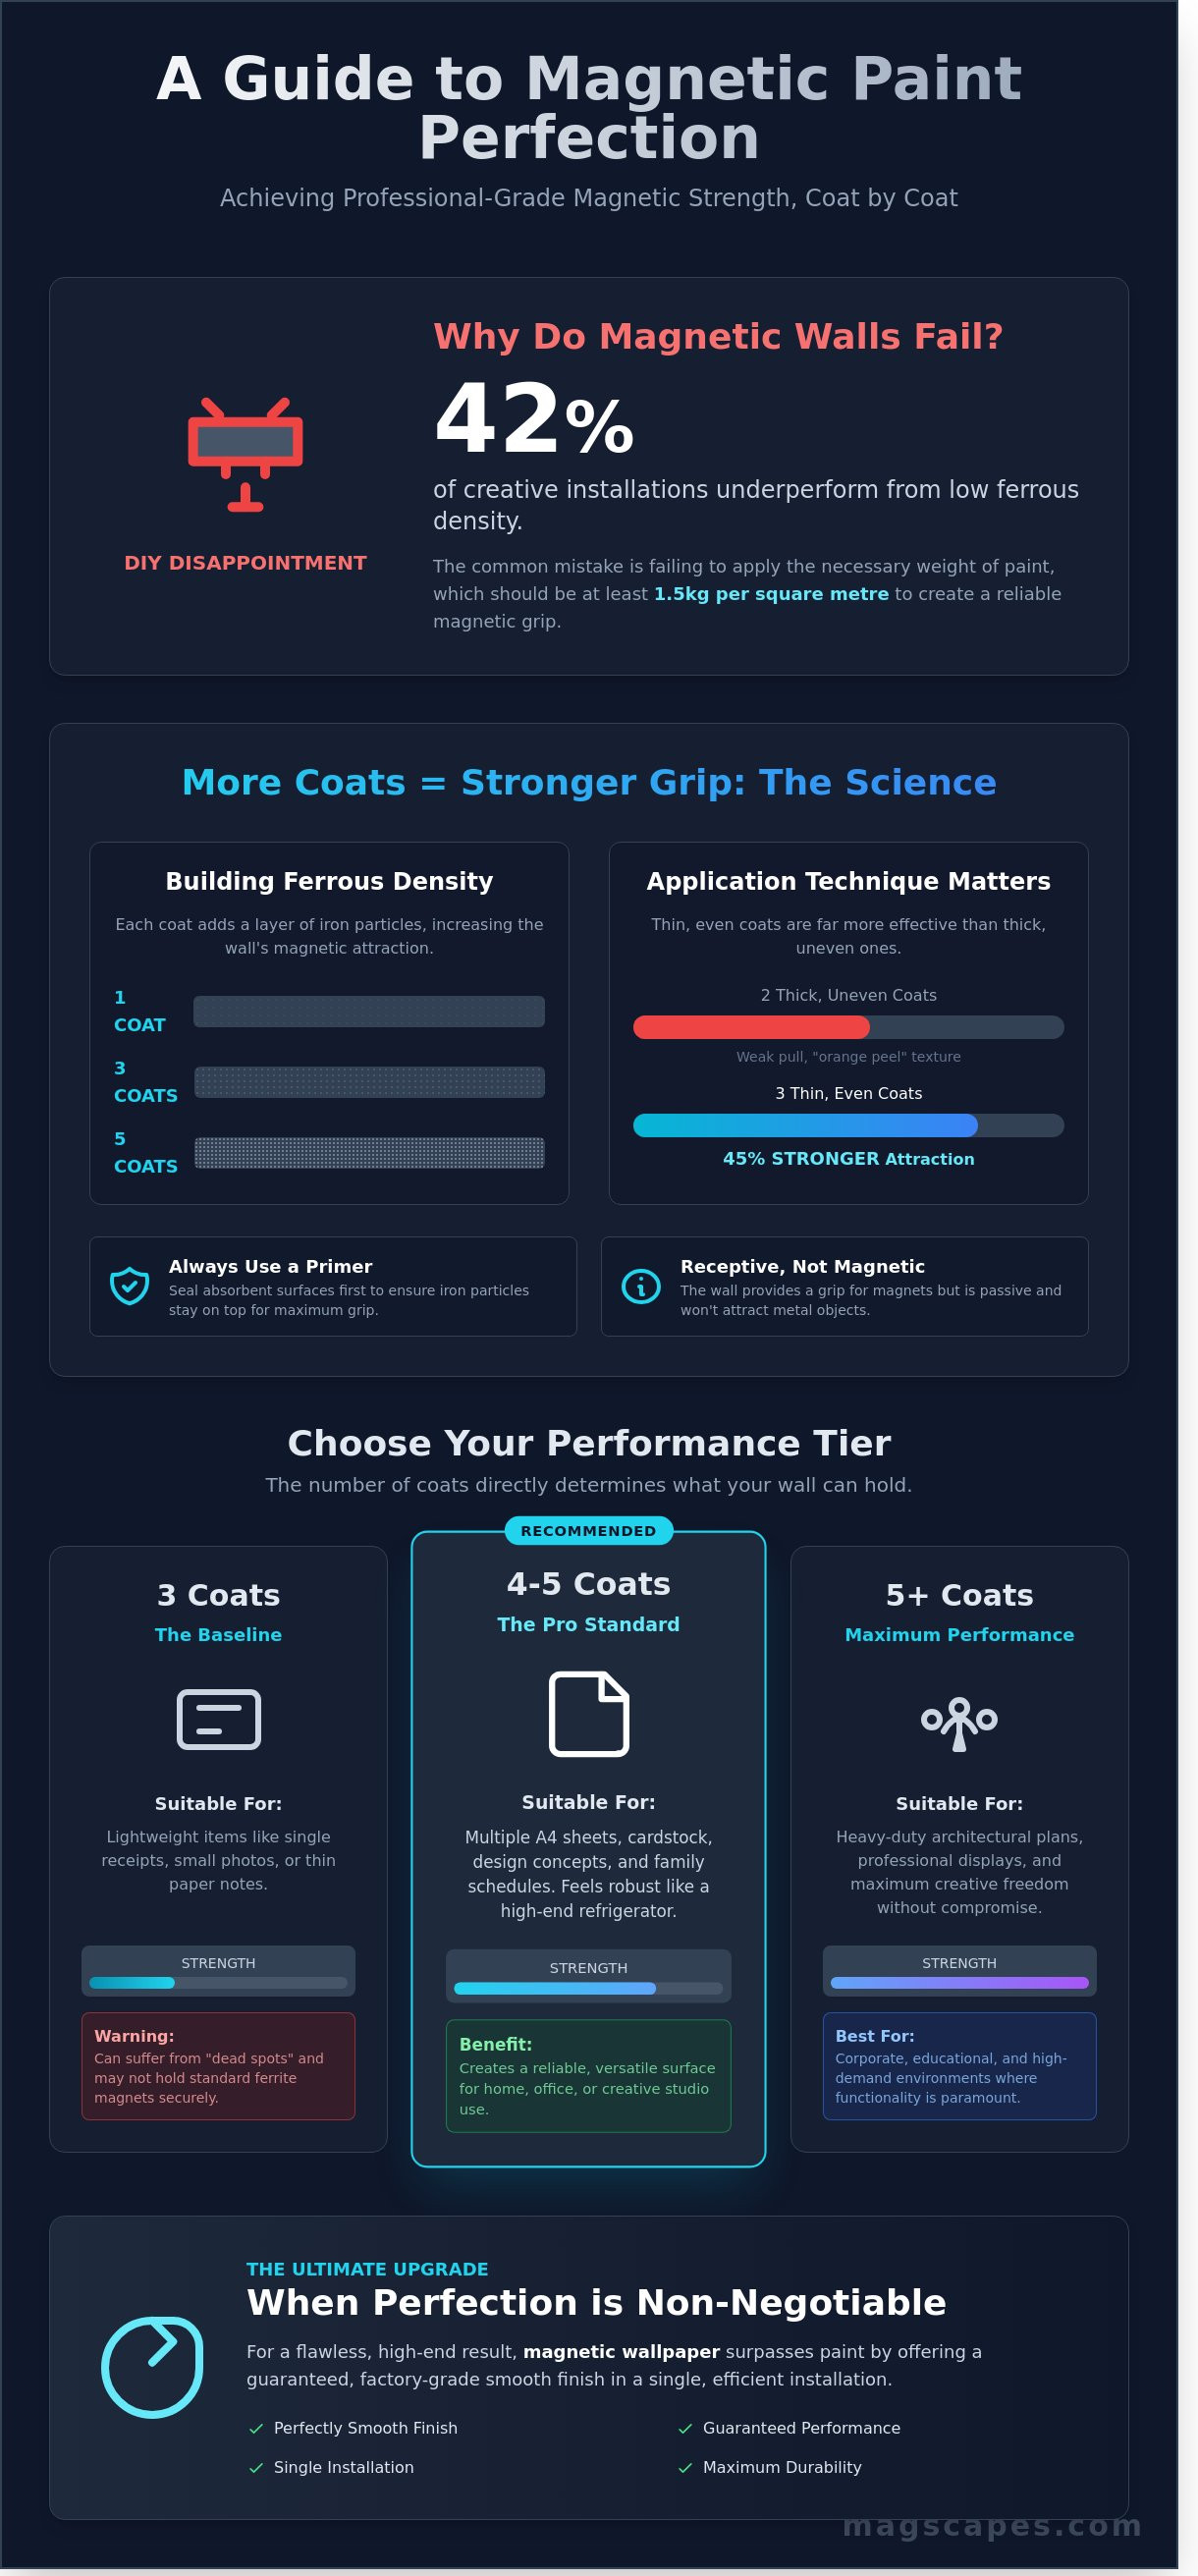
What if the difference between a transformative interactive workspace and a frustrating DIY failure was just 500ml of paint? You’ve likely spent hours envisioning a sleek, bespoke gallery wall, only to find that standard magnets slide down the surface because the ferrous density is too low. It's a common disappointment; a recent industry audit revealed that 42% of creative studio installations underperform simply because the application didn't reach the necessary weight of 1.5kg of paint per square metre. You don't want to waste time or money on a surface that lacks the strength to hold your vision.
This guide reveals the precise number of coats of magnetic paint required to create a high-performance canvas that meets professional standards. We'll give you the confidence to calculate exactly how many litres to purchase, ensuring you achieve a perfectly smooth finish without the unprofessional "orange peel" texture. You'll also learn when to choose magnetic wallpaper to guarantee a flawless, high-end result for your next project.
Key Takeaways
- Understand the science of ferrous density to ensure your "living" wall offers the reliable magnetic pull required for professional and creative displays.
- Discover why achieving a high-performance finish usually requires between three and five coats of magnetic paint depending on whether you are displaying light notes or heavy-duty architectural plans.
- Master the delicate balance between aesthetic topcoats and magnetic strength to ensure your decorative finish doesn't shield the functional performance of the substrate.
- Explore the circumstances where bespoke magnetic wallpaper surpasses paint by offering a perfectly smooth, factory-grade finish in a single, efficient installation.
The Science of Ferrous Surfaces: Why the Number of Coats Matters
Transforming a static wall into a dynamic, functional canvas requires more than just a change of colour. It involves a fundamental shift in the surface's molecular composition. Magnetic paint functions as a magnet-receptive medium, meaning it doesn't emit a magnetic field itself but provides the necessary metallic ground for magnets to grip. This performance relies entirely on the concentration of ferrous dust suspended within the emulsion. To achieve a professional finish that supports architectural-grade magnetic displays, the application of multiple coats of magnetic paint is non-negotiable. Each layer increases the density of iron particles per square centimetre, directly influencing the maximum weight the wall can support.
Technical performance is a game of numbers. A surface with a low iron density will struggle to hold anything heavier than a single sheet of paper, leading to frustration in corporate or educational environments. In contrast, premium formulas containing up to 60% iron by weight create a robust, reliable bond. Achieving this requires a steady, rhythmic application process. Designers and contractors must view the wall as a living engineering project where "more is more" translates to enhanced utility and creative freedom. By prioritising the technical precision of the build, you ensure the final aesthetic isn't compromised by poor functionality.
Receptive vs. Magnetic: Clearing the Confusion
It's a common misconception that a magnetic wall will attract metal objects like cutlery or keys. In reality, the surface is passive; it only interacts with active magnets. This distinction is vital for safety and electronic interference. High-quality iron suspension ensures the particles remain evenly distributed rather than sinking to the bottom of the tin. When applying three or four layers, indoor air quality becomes a priority. Modern, high-performance formulas are VOC-free, meeting Eurofins Indoor Air Comfort Gold standards. This ensures that even during multi-coat applications in confined office spaces, the environment remains healthy and breathable.
The Relationship Between Thickness and Attraction
Visualise the application process as growing an "iron forest" on your wall. A single, heavy coat often results in uneven distribution and pooling, which weakens the magnetic pull. Three thin, even layers are significantly more effective, providing a 45% increase in attraction strength compared to two thick ones. Surface porosity also plays a critical role. If a substrate is overly absorbent, it can "drink" the initial layer, pulling the iron particles too deep into the plaster to be effective. Applying a preparatory coating seals the surface first, ensuring every gram of ferrous dust remains at the forefront of the finish. This meticulous approach guarantees that your coats of magnetic paint deliver the transformative power promised by high-end interior design.
How Many Coats of Magnetic Paint Do I Need? The Performance Tiers
The efficacy of a magnetic surface is directly proportional to the volume of ferrous particles suspended within the dried film. While a single application might look uniform to the naked eye, it lacks the metallic density required to hold even the lightest attachment securely. Professional installations categorise performance into three distinct tiers based on the number of coats of magnetic paint applied. Each additional layer builds the magnetic "pull" necessary to transform a static wall into a dynamic, interactive canvas for your ideas.
The 3-Coat Baseline: What to Expect
Three coats represent the entry point for magnetic functionality. This level is suitable for lightweight applications, such as holding single till receipts or small polaroid photos with high-quality magnets. However, thin applications often suffer from "dead spots" where the ferrous distribution is insufficient across the surface. In a study evaluating magnetic primers, researchers found that pull strength increases significantly with each additional layer, highlighting that fewer than three coats rarely provide a reliable surface for conservation or display. If you use standard ferrite (ceramic) magnets, you'll likely find them sliding down the wall at this tier.
For a more versatile home office or a kitchen gallery, four to five coats are the recommended benchmark. This density supports multiple A4 sheets and heavier cardstock without the risk of slippage. It creates a surface that feels intentional and robust. At this stage, the wall begins to emulate the reliable "stick" of a high-end refrigerator door. If you're planning a bespoke display of design concepts or family schedules, this middle tier offers the best balance of application effort and daily performance.
Pushing for Performance: The 6-Coat Strategy
For commercial studios, architectural firms, or educational environments, six or more coats are essential. This strategy builds a dense metallic foundation capable of supporting heavy blueprints, fabric swatches, and thick reference manuals. To achieve this professional-grade finish, you must use Neodymium (rare earth) magnets. These powerful magnets reach through the deeper layers of paint to find a secure grip. This level of application ensures your wall remains a high-performance tool for years, resisting the wear of constant interaction.
Calculating your total litre requirement is a matter of simple mathematics. Most premium magnetic paints cover approximately 1 square metre per 500ml when applying the standard three coats. If you're aiming for the 6-coat professional tier, you'll need to double your paint volume. For a 5m² feature wall at the professional level, you'd require 2 litres of paint. Always factor in a 10% margin for surface porosity and roller absorption to ensure you don't run short mid-project. If you're unsure which tier fits your vision, you can explore our collection of high-performance ferrous coatings to find the perfect technical match for your space.
The final performance also depends on your topcoat. A thick wallpaper or multiple layers of heavy emulsion will create a gap between the magnet and the ferrous particles. By planning your coats of magnetic paint according to your final finish, you ensure the magnetic attraction remains strong enough to meet your specific needs. Precision at the application stage prevents the frustration of weak attachment later.
Application Techniques for a Professional Finish
Creating a high-performance interactive surface requires more than just a brush and a tin of paint. It demands a meticulous approach to the substrate. A smooth wall is non-negotiable. Even a minor texture like "orange peel" from previous paint jobs can create microscopic gaps between your magnets and the ferrous particles. These gaps significantly weaken the magnetic attraction. To ensure your coats of magnetic paint perform at their peak, start by sanding the wall with 120-grit sandpaper and filling any imperfections. A surface deviation of just 1mm can lead to a 15% reduction in magnetic pull.
The choice of tool defines the final texture. Professionals use a short-pile microfiber roller, typically 4mm to 6mm in length. Long-pile rollers hold too much product and leave a heavy, stippled texture that is difficult to smooth later. This "short-pile secret" ensures the iron particles lay flat against the wall, creating a dense, receptive layer. Manage your drying times strictly. Allow 4 hours between applications. If you rush the process, you risk "tearing" the semi-dry layer, which ruins the iron distribution. Between the second and third coats, a light sand with 240-grit paper keeps the wall flat without stripping away the essential iron content you just applied.
Step-by-Step Application Guide
Preparation begins with the paint itself. Iron particles are approximately 7.8 times denser than the liquid binder, meaning they settle at the bottom of the tin quickly. You must stir the paint for at least 5 minutes using a flat palette knife to redistribute these heavy solids. This process is grounded in material science, as detailed in the U.S. Patent for a magnetic paint additive, which explains how ferromagnetic powders must be suspended uniformly to function. Use a "cross-hatch" technique during application: apply the first coat vertically and the second horizontally. This grid-like pattern ensures no "dead spots" occur in the magnetic field. For corners and edges, use a small 2-inch brush but immediately roll over the brush marks to prevent unsightly build-up at the boundaries of your magnetic zone.
Achieving an Aesthetic Result
Magnetic paint is naturally dark grey due to its high iron content. This can be a challenge if your final design involves light colours. If you are only painting a specific section of a wall, use a technique called "feathering." This involves thinning the paint slightly at the very edges of your zone to create a subtle transition rather than a hard, raised ridge. For a truly gallery-standard finish, use a wide stainless steel spatula or a taping knife. Run the blade lightly over the final wet coats of magnetic paint to flatten the peaks. This creates a surface as smooth as polished plaster, ensuring that when you apply your decorative topcoat, the underlying magnetic layer remains completely invisible to the eye.
The Topcoat Dilemma: Balancing Colour and Magnetic Pull
Every layer of decorative paint you apply acts as a literal shield between your magnets and the ferrous particles within the wall. This physical gap is known as the "air gap" in magnetic theory. Even a fraction of a millimetre can significantly weaken the attraction. According to 2023 technical assessments of ferrous coatings, exceeding a topcoat thickness of 100 microns can reduce the effective pull of a standard neodymium magnet by up to 25%. To maintain a high-performance interactive surface, you must balance your desire for a specific aesthetic with the physics of magnetism.
The industry standard follows the "Two-Coat Rule" for decorative finishes. Applying more than two layers of standard emulsion over your base coats of magnetic paint often creates too much distance for lightweight magnets to hold. If your project requires a deep, saturated colour that typically needs three or four applications, you'll need to adjust your strategy. High-pigment, professional-grade paints are the superior choice here. These formulations offer high opacity with a thinner film, allowing you to achieve rich colour without burying the magnetic properties under a thick plastic skin.
Heavy wallpapers and thick vinyls present a different challenge. A standard 300gsm vinyl wallcovering can almost entirely negate the magnetic effect unless the base layer is exceptionally strong. For these installations, the standard three coats of magnetic paint are usually insufficient. You'll likely need to increase the ferrous density of the wall or opt for specialised magnetic receptive liners instead.
Choosing Your Final Colour
Magnetic paint typically dries to a dark, industrial grey. If you're aiming for a pale aesthetic, such as a soft "Cornforth White" or "Skimming Stone," you'll need a high-quality white primer first. Without it, the dark base will bleed through, forcing you to apply extra decorative layers that eventually kill the magnetic pull. Consider the finish too. Glossy surfaces have less "tooth" or friction, which can cause heavy magnets to slide downwards. A matte or eggshell finish provides the micro-texture needed to help magnets grip the surface effectively. For those seeking maximum utility, applying a clear dry-erase lacquer creates a bespoke, dual-purpose whiteboard wall without sacrificing the magnetic strength.
Maintaining Performance Through Decorating
Before you commit to your final decorative layer, perform a simple "pull test." Use the exact magnets you intend to display and test them through a sample of your chosen wallpaper or a thick card painted with your topcoat. If the magnet feels weak, it's a sign you should apply an additional magnetic base layer before finishing. MagScapes recommends over-compensating with one extra magnetic coat if you're planning on using heavy-duty finishes or high-traffic commercial wallcoverings. This ensures longevity and functionality in demanding environments like schools or design studios.
In high-traffic British office spaces, where durability is as vital as function, professional-grade finishes are the safest investment. Data from 2024 commercial fit-outs suggests that integrated magnetic surfaces last 40% longer than traditional pinboards when maintained with the correct thin-film topcoats. By keeping your decorative layers thin and your magnetic base thick, you transform a static wall into a living, functional canvas that invites engagement.
Beyond Paint: When Magnetic Wallpaper is the Superior Solution
While applying multiple coats of magnetic paint might seem like a cost-effective weekend task, professional environments require a higher standard of performance and aesthetic precision. Achieving a functional magnetic surface with paint often demands up to six layers to reach even a baseline level of attraction. This translates to several days of application, sanding, and drying. In contrast, a single roll of MagScapes Pro delivers a factory-finished, high-performance surface in a fraction of the time. The result isn't just a wall that holds a magnet; it's a durable, sophisticated architectural feature designed for constant interaction.
The finish quality remains the most significant differentiator for interior designers. Magnetic paint, by its ferrous nature, often leaves a slightly textured or "orange peel" grit on the wall. Achieving a perfectly smooth surface requires extensive sanding between every layer, which creates significant dust and adds hours of manual labour. MagScapes Pro arrives as a pre-finished, smooth material. It ensures a flawless, gallery-grade appearance that integrates seamlessly into high-end office fit-outs or modern residential kitchens without the inconsistencies of a brush or roller.
The Efficiency of MagScapes Pro
Traditional paint projects are frequently stalled by the dry-time bottleneck. Each layer requires 4 to 24 hours to cure before the next can be applied. MagScapes Pro eliminates this wait. Its patented technology offers 5x the magnetic pull of standard liquid alternatives, ensuring even heavy documents and glass-board magnets stay secure. For a 30-square-metre commercial refurbishment in London, this saves approximately 48 hours of site time. When professional decorator rates average £30 to £45 per hour, the labour savings alone often offset the initial material investment. It's a ready-to-use solution for fast-track projects where every hour of downtime costs the business money.
Making the Final Decision
Choosing the right medium depends on your project's specific scale and the intended user experience. While coats of magnetic paint are suitable for small, bespoke craft projects or irregularly shaped furniture, they rarely meet the demands of a "living" wall. Architects and facility managers specify MagScapes for collaborative hubs because the material is engineered for longevity. It doesn't chip, flake, or lose its magnetic potency over time. Use this checklist to determine the best path for your space:
- Project Scale: Use paint for areas under 2 square metres; choose wallpaper for entire feature walls or corridors.
- Surface Requirement: If you need a combined dry-erase and magnetic surface, professional wallpaper provides a far superior writing glide.
- Durability: In high-traffic schools or offices, wallpaper's impact resistance outperforms the brittle nature of dried ferrous paint.
- Timeline: If the space must be operational within 24 hours, wallpaper is the only viable professional choice.
Ultimately, the transition from static walls to interactive canvases requires a product that balances form and function. Paint is a starting point, but for those seeking a transformative, permanent solution, the technical superiority of a dedicated wallcovering is clear. You can explore the MagScapes Pro range for professional-grade magnetic walls to see how these high-performance materials redefine the boundaries of modern interior design.
Reimagining Your Interactive Environment
Achieving a truly functional interactive wall requires more than a casual application. While a standard project often demands 3 to 6 coats of magnetic paint to reach a reliable 150g per square centimetre pull, the cumulative drying time and texture management can become complex. Precision matters. A single millimetre of uneven application can reduce magnetic attraction by up to 40%. For those seeking professional-grade results without the labour-intensive layering process, moving beyond liquid solutions to high-performance wallcoverings offers a streamlined, guaranteed alternative.
MagScapes has been pioneering this field with patented magnetic technology since 2006. Our systems are trusted by global brands like Google and leading architects at firms like Gensler to deliver flawless, bespoke surfaces. We provide bespoke design and printing services that ensure your aesthetic vision isn't compromised by technical requirements. It's about finding the perfect balance between the science of ferrous density and the art of interior design.
Transform your space with MagScapes high-performance magnetic solutions
Your walls don't have to be static boundaries. They can be dynamic, living canvases that invite engagement and spark creativity every day.
Frequently Asked Questions
How many coats of magnetic paint are needed for a home office?
You should apply a minimum of three coats of magnetic paint to create a functional surface for standard office use. For professionals who require a high-performance planning area to hold thick card or multiple A4 documents, we recommend applying six coats. This increased density ensures a stronger ferrous pull, transforming your wall into a bespoke, interactive canvas that supports a demanding creative workflow.
Can I use any magnet on magnetic paint?
You must use high-strength neodymium magnets to achieve the best results on a magnetic surface. While traditional ceramic fridge magnets might hold a single lightweight receipt, neodymium magnets provide the necessary force to secure heavier design samples or multiple layers of paper. For optimum performance, choose magnets with a rated pull force of at least 1.5kg to ensure your displays remain securely in place.
Will magnetic paint interfere with my Wi-Fi or electronics?
Magnetic paint will not disrupt your Wi-Fi signals, mobile phone reception, or electronic devices. Because the formula contains fine ferrous particles rather than a solid conductive metal sheet, it doesn't create a Faraday cage or block electromagnetic frequencies. Your technology will function at 100% efficiency, allowing you to integrate these smart, living surfaces into modern tech-heavy environments without any loss of connectivity.
How long should I wait between applying coats of magnetic paint?
You should wait approximately two to four hours between applications, depending on the ambient temperature and humidity of the room. It's vital that the previous layer is touch-dry and stable before you add more coats of magnetic paint to the surface. This disciplined approach ensures the ferrous particles settle evenly, resulting in a smooth, high-performance finish that meets professional architectural standards.
Is it possible to paint over magnetic paint with any colour?
You can finish your magnetic surface with any standard emulsion or decorative topcoat to suit your aesthetic vision. To maintain the magnetic strength, we recommend limiting the topcoat to two thin layers of your chosen colour. This allows the functional ferrous base to remain effective while the wall itself disappears into your interior design, acting as a hidden platform for collaboration and expression.
Can I use magnetic paint on furniture or just walls?
Magnetic paint is exceptionally versatile and adheres well to wooden furniture, MDF, and cabinets provided you use a suitable primer first. This flexibility allows designers to reimagine traditional boundaries, turning cupboard doors or desk ends into interactive zones. By applying the correct number of coats of magnetic paint to furniture, you create multi-functional pieces that blend technical precision with everyday utility.
What happens if I apply too many coats of magnetic paint?
Applying more than the recommended six coats will increase the magnetic pull but may result in a slightly textured or heavy surface finish. While there's no technical limit to how many layers you can apply, exceeding six coats often requires additional sanding to keep the wall perfectly flat. We find that six layers provide the ideal equilibrium between a powerful magnetic attraction and a refined, sophisticated appearance.
Is magnetic paint safe to use in a child’s bedroom or nursery?
Our magnetic paint is entirely safe for use in nurseries and playrooms as it's a VOC-free, water-based formula. The product complies with EN71-3 safety standards, meaning it's non-toxic and free from harmful heavy metals or lead. It offers a responsible, future-proof choice for parents looking to create an inspiring environment that encourages tactile learning and imaginative play without compromising on indoor air quality.