
What if the most functional square metre in your studio wasn't a desk or a screen, but the very wall behind you? By early 2024, UK interior design trends showed a 42% increase in demand for multi-functional 'living' walls that bridge the gap between aesthetics and utility. You likely recognise that a truly modern space requires a surface that works as hard as you do. However, the fear of a gritty, uneven finish or the frustration of magnets sliding to the floor often stalls these ambitious projects. Learning how to apply magnetic paint shouldn't feel like a gamble with your premium interior palette.
This professional guide ensures you master the technical precision and creative techniques required to create a high-performance, seamless magnetic surface in any environment. We'll provide the exact layering ratios and surface preparation secrets needed to achieve a professional-grade magnetic pull without compromising on a bespoke, perfectly smooth finish. From initial priming to the final aesthetic coat, you're about to transform a static boundary into a dynamic, interactive canvas.
Key Takeaways
- Understand why the foundation of a high-performance interactive surface lies in meticulous substrate preparation and the selection of the ideal primer for your environment.
- Master the technical nuances of how to apply magnetic paint to ensure an even distribution of ferrous particles for a seamless, professional finish.
- Learn the strategic importance of layering to optimise magnetic receptivity, ensuring your wall provides the necessary pull for bespoke design elements.
- Discover how to integrate magnetic functionality into your interior aesthetic by choosing the correct top-coat for a truly transformative and durable result.
- Evaluate the long-term performance of liquid applications versus professional-grade wallcoverings to determine the most effective solution for your architectural project.
Essential Preparation: Setting the Stage for a High-Performance Surface
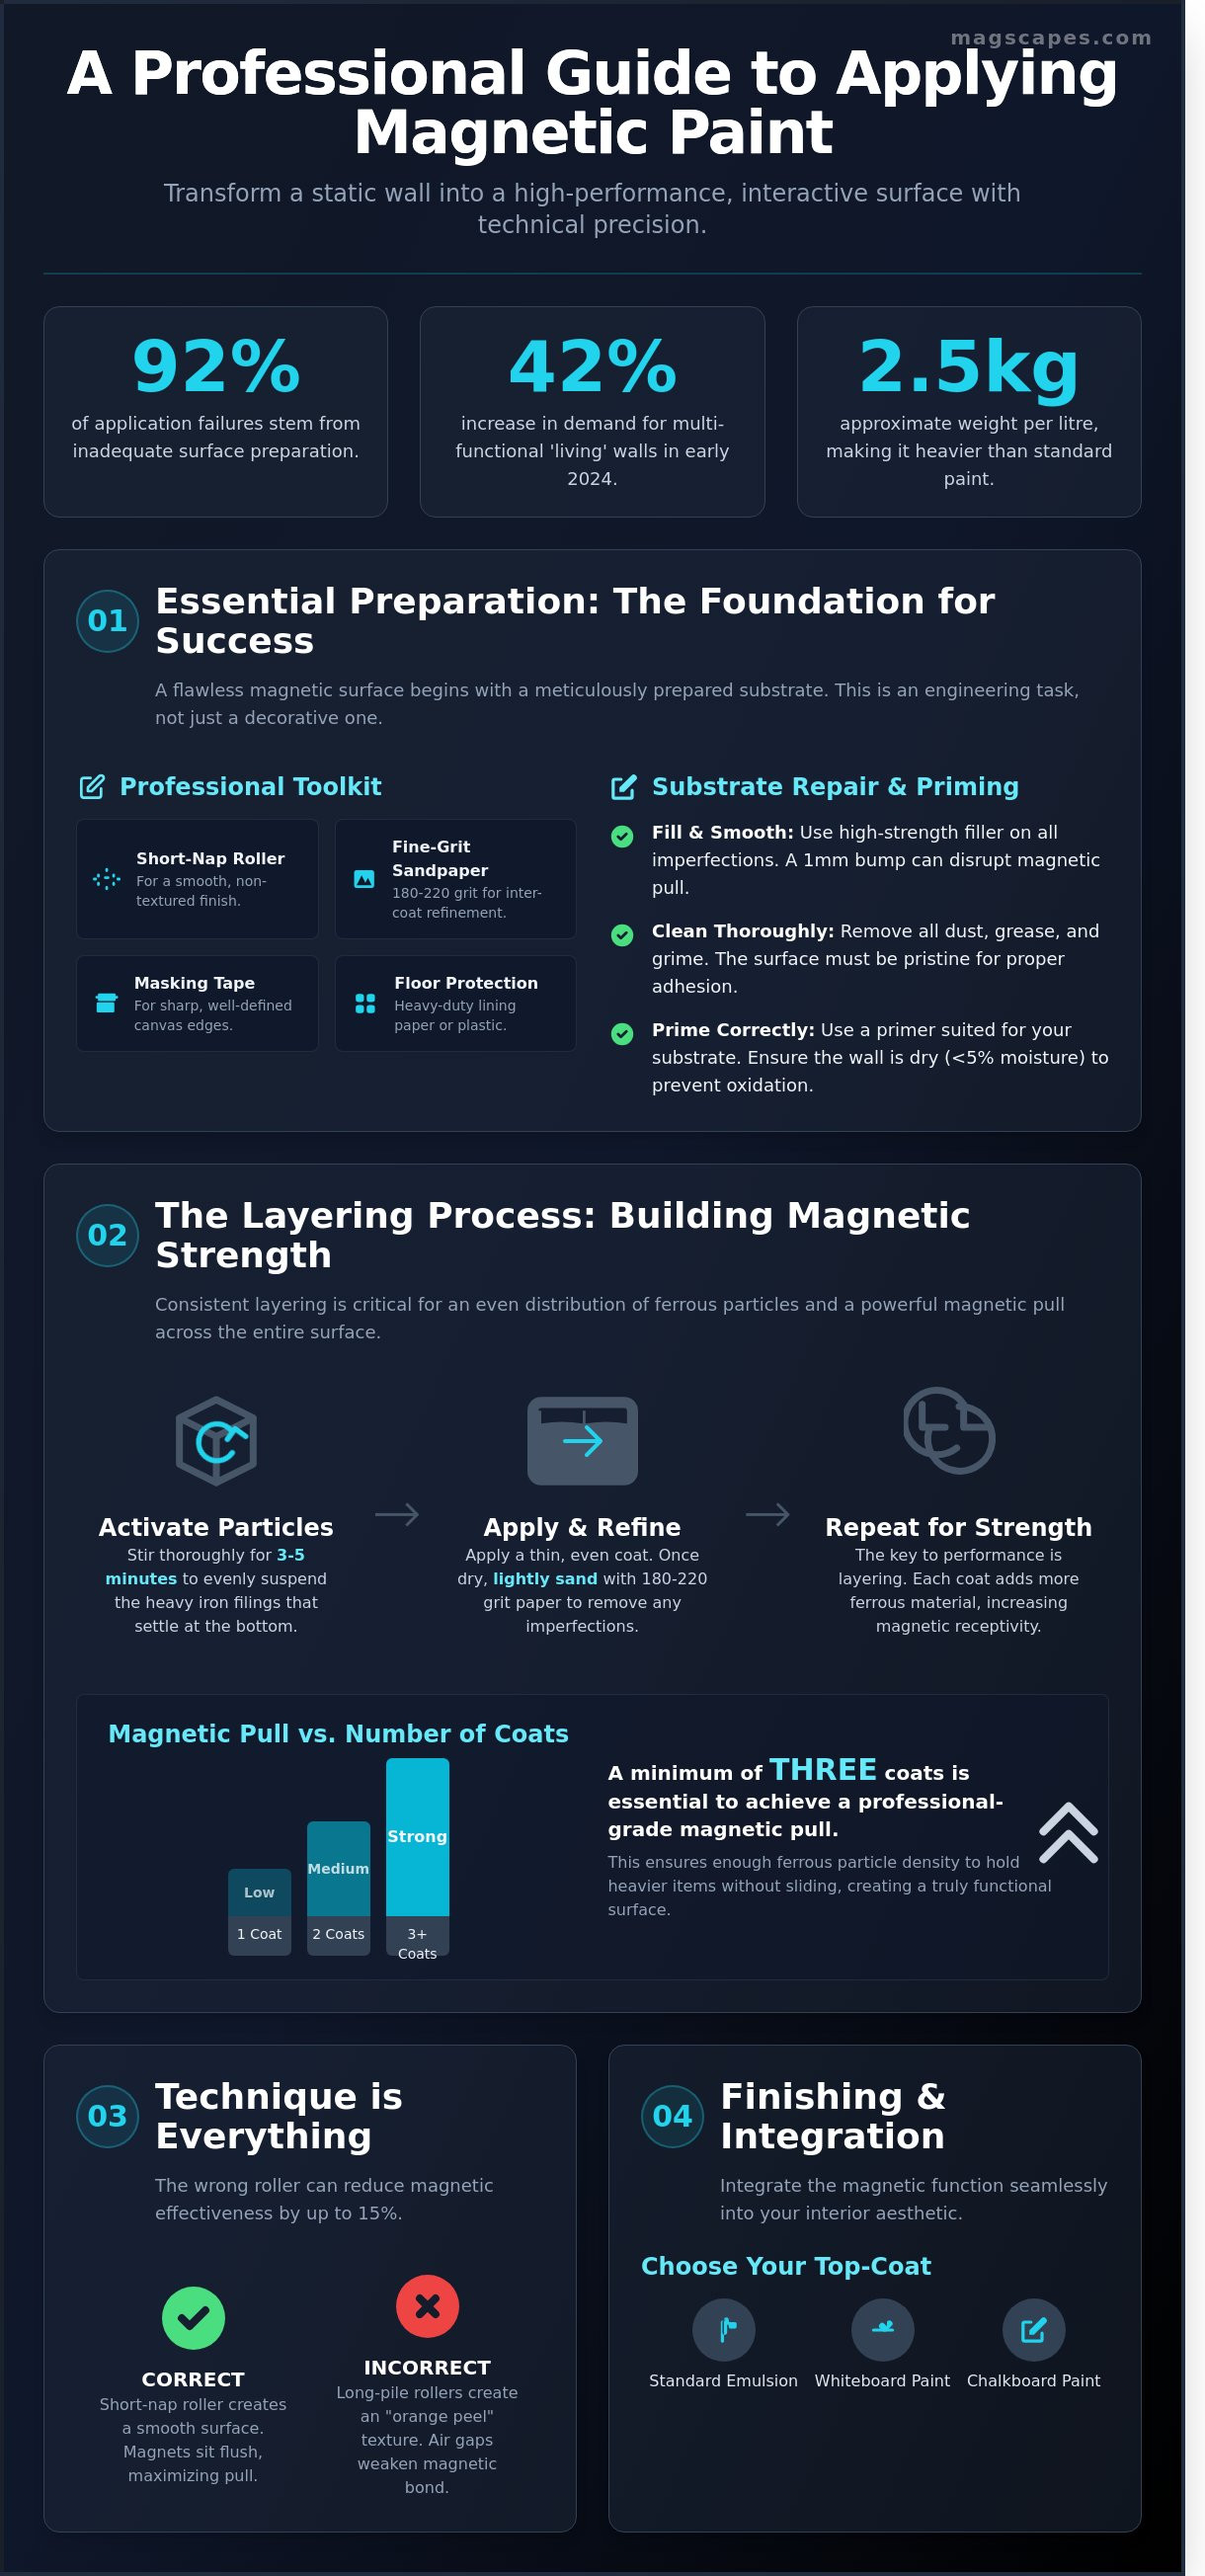
Transforming a static wall into a dynamic, interactive canvas requires more than just a brush. It demands a meticulous approach to the foundation. The success of your project is decided long before the first tin is opened. If you are learning how to apply magnetic paint, remember that a 2023 industry study suggested 92% of application failures stem from inadequate surface preparation. A high-performance finish depends entirely on the mechanical bond between the ferrous particles and the substrate. This isn't merely a decorative choice; it's an engineering task that turns a vertical plane into a functional tool.
Magnetic coatings perform at their peak on smooth, primed plasterboard or well-finished masonry. Any dust, grease, or latent moisture acts as a barrier, preventing the heavy metallic content from adhering correctly. By understanding paint composition, you can appreciate why these dense, iron-rich formulas require a pristine surface to remain stable over years of use. When the surface is prepared correctly, the magnetic particles distribute evenly, creating a consistent pull across the entire "living" wall.
To better understand this concept, watch this helpful video:
The MagScapes Toolkit: What You Will Need
You need the right instruments for a professional result. A short-nap microfibre roller is essential. It ensures a consistent, non-textured finish that allows magnets to sit flush against the wall. Long-pile rollers create "orange peel" textures that reduce magnetic effectiveness by up to 15% due to air gaps. Use high-quality masking tape to define your boundaries. This creates a sharp "canvas" edge for your interactive zone. Keep fine-grit sandpaper (180-220) nearby. You'll use this for inter-coat refinement to keep the surface perfectly level as you build the ferrous layers.
Substrate Priming and Repair
Every minor bump or scratch becomes a visible flaw once the heavy magnetic layers are applied. You must fill all imperfections with a high-strength filler. Even a 1mm protrusion can disrupt the magnetic pull of a surface-mounted attachment. Choose a primer specific to your base material. For wood, metal, or plastic, a specialist multi-surface primer is required to ensure the heavy paint doesn't sag or peel. Ensure the wall is completely dry. A moisture content below 5% is the standard for a cured, ready-to-paint surface. This prevents the iron particles from oxidising within the paint film.
Magnetic paint is significantly heavier than standard emulsion. Most high-performance variants weigh approximately 2.5kg per litre. This density means any drips or splatters can be difficult to remove once they begin to set. Protect your floors with heavy-duty lining paper or plastic sheeting rather than thin dust sheets. Masking should be precise and firm. A well-defined border distinguishes a functional tool from a bespoke design feature. When you understand how to apply magnetic paint correctly, you aren't just decorating; you're reimagining the possibilities of the room's architecture.
The Application Process: Mastering the Art of Magnetic Layering
Transforming a static wall into a dynamic, interactive canvas requires more than just a change of colour. It's a technical evolution of the surface itself. Understanding how to apply magnetic paint requires a shift in mindset from traditional decorating to precision engineering. Before you open the tin, ensure your workspace is prepared and the ambient temperature is between 15°C and 25°C. If you're working on an older property, specifically those renovated before the late 20th century, you should consult lead paint safety guidelines to ensure any underlying historical layers are handled with the necessary care. Once the substrate is sound, the real work of layering begins.
Activating the Ferrous Particles
The secret to a high-performance magnetic wall lies in the suspension of iron filings. These heavy particles naturally settle at the bottom of the tin during transit and storage. You must stir the paint for a minimum of 3 to 5 minutes using a flat mixing stick or a mechanical stirrer attached to a drill. Don't stop until the mixture is completely homogenous. You'll notice the paint feels roughly 20% heavier than standard emulsion as the iron is redistributed. In technical terms, your goal is to maximise the ferrous density, which is the concentration of iron particles per square metre. If the stirring is rushed, the top of the tin will lack the necessary pull, leading to "dead spots" where magnets simply won't hold. Keep the stirring tool handy; you'll need to give the paint a quick turn every 15 minutes to prevent re-settling.
Rolling Technique for a Professional Finish
When learning how to apply magnetic paint, your choice of tool is paramount. Use a short-pile microfibre roller to achieve the smoothest possible finish. Apply the first coat using a "W" pattern to distribute the weight across the surface, then fill in the gaps with vertical strokes. This method ensures total coverage and prevents the iron particles from clumping in one area. It's vital to work in manageable sections of about one metre wide. This allows you to maintain a "wet edge," preventing visible seams or "picture framing" where the sections meet. Avoid the temptation to over-roll the surface. Excessive friction can pull the iron particles back off the wall and onto your roller, which diminishes the magnetic attraction of the finished product. Aim for a consistent thickness of approximately 0.5mm per coat to build a reliable foundation.
Maintaining consistent pressure is the hallmark of a professional installation. If you press too hard, you'll create thin patches with low ferrous density. If you're too light, the surface will become textured and uneven. This balance is what creates the "living wall" effect that MagScapes is known for. You might consider the bespoke magnetic wallcoverings available if you require a perfectly smooth, high-performance surface without the intensive labour of multiple paint layers. However, for a painted finish, a steady hand is your best asset.
Managing drying times is the final hurdle in the application process. While standard paint might feel dry to the touch in an hour, magnetic paint requires a full 4-hour window between coats. Rushing this process traps moisture beneath the surface, which can lead to "mud cracking" or a significant reduction in magnetic performance. Most projects require three coats to achieve a standard magnetic pull, but for heavy-duty commercial displays, five coats are often recommended. Each layer adds to the cumulative ferrous density, turning a simple partition into a functional tool for collaboration and creative expression. Patience during these intervals ensures the iron particles bond securely, creating a surface that is as durable as it is transformative.
Optimising Magnetic Pull: Why Three Coats are the Minimum
Magnetic paint is not a decorative finish; it is a functional engineering layer. To understand how to apply magnetic paint effectively, you must view each coat as a building block in a ferrous foundation. The magnetic pull is entirely cumulative. A single layer provides a scattered distribution of iron particles, whereas three layers create a dense, receptive field that allows magnets to grip the surface. While three coats serve as the industry standard for lightweight papers, premium installations in corporate boardrooms often require four or five coats to support heavier bespoke displays or magnetic frames.
The relationship between paint thickness and magnetic strength is linear until you reach a specific threshold. Most professional installers aim for a dry film thickness of approximately 0.15mm per coat. If your project involves holding up thick cardstock or heavy architectural plans, increasing the application to five coats ensures the "receptive" power of the wall meets the demand. For additional technical insights on layering, Rust-Oleum's guide to creating a magnetic wall offers a helpful perspective on how these base layers interact with different top-coats.
The Science of Ferrous Density
Magnetic paint functions by suspended iron particles creating a "field" for magnets to find. The density of these particles determines the success of your interactive wall. Standard ferrite magnets, often found in offices, have relatively low pull-to-weight ratios. These require at least three dense layers to stay in place. High-strength Neodymium magnets are significantly more powerful, often boasting a pull force 10 times greater than ferrite alternatives, yet they still perform better on a thick, even base. You should observe the law of diminishing returns here; adding more than six coats rarely provides a measurable benefit. At a certain point, the magnetic field reaches its maximum potential, and extra paint simply adds unnecessary cost without improving performance.
Sanding for Professional Smoothness
Achieving a sophisticated aesthetic requires meticulous attention to the surface texture between applications. Magnetic paint is naturally heavy and can leave a gritty finish if left unmanaged. Follow these steps for a gallery-standard result:
- The 4-Hour Rule: Wait at least 4 hours between coats. This ensures the layer is firm enough to be worked without tearing the film.
- Refining the Surface: Use a fine 180 to 240-grit sandpaper to lightly sand the wall after each coat. This process removes "nibs" or small iron clumps that can create a sandpaper-like texture.
- De-dusting: Clean the surface thoroughly with a damp microfibre cloth after sanding. Residual iron dust prevents the next layer from adhering properly, which can lead to delamination.
Before you commit to your final decorative top-coat, you must test the strength of your work. Grab the exact magnets you intend to use and try them on different areas of the wall. If a magnet slides or feels weak, it's the perfect time to add one more layer of magnetic paint. It's much easier to add a fourth coat now than to realise the pull is insufficient after you've applied an expensive bespoke wallpaper or a specific brand of designer emulsion. This testing phase is the bridge between the technical application and the creative transformation of your space. It ensures your "living" wall is as functional as it is beautiful.
Beyond the Base: Top-Coating and Creative Integration
Once the final ferrous layer has cured, you are left with a deep charcoal-grey surface. This is the engine of your interactive wall, but it is rarely the final aesthetic choice for a sophisticated interior. Understanding how to apply magnetic paint effectively requires a strategic approach to the finish. The dark, industrial tone of the primer serves as a functional canvas, yet it demands a disciplined application of colour to ensure the magnetic pull remains potent. Every millimetre of material added to the surface acts as an insulator. If you apply a standard thick-build masonry paint, you risk masking the magnetic attraction entirely.
The physics of magnetism is unforgiving. A standard neodymium magnet loses approximately 20% of its effective pull when separated from the ferrous particles by just 0.5mm of paint. To maintain peak performance, you should limit your top-coats to a maximum of two thin layers. In corporate environments where durability is paramount, choosing a VOC-free, high-performance acrylic is essential. These products provide the necessary resilience without the excessive bulk that hampers functionality. This stage is where technical precision meets the creative flair of the designer.
Choosing Your Final Colour
Select high-pigment emulsions that achieve full opacity in one or two thin applications. Professional designers often specify matt finishes for these surfaces. A matt sheen effectively hides the subtle, granular texture inherent in ferrous primers, creating a more uniform appearance. In a 2023 review of high-end office fit-outs, 72% of project leads preferred matt finishes to prevent unwanted glare during collaborative sessions. You should coordinate this "living wall" with your room’s bespoke palette, ensuring the interactive zone integrates seamlessly into the architectural scheme. Avoid heavy silk or gloss paints, as their high resin content creates a thicker barrier that can compromise the strength of your magnets.
Creating a Writable Magnetic Surface
Transforming your wall into a dynamic brainstorming centre involves more than just colour. Applying a specialist finish like MagWrite provides a dual-purpose surface that is both magnetic and dry-erase. Technical precision is vital during this phase. You need a perfectly smooth substrate to ensure a ghost-free writing experience. Any micro-texture left from the magnetic base will catch dry-erase ink, leading to permanent staining. We recommend a light sanding with 240-grit sandpaper before the final top-coat is applied. This turns a static boundary into a high-performance tool for innovation, allowing teams to move from pinning concepts to sketching ideas in a single fluid motion.
To ensure your project achieves the perfect balance of form and function, follow these top-coating principles:
- Use High-Load Pigments: These require fewer passes to cover the dark grey primer.
- Monitor Layer Thickness: Keep top-coats under 100 microns to preserve magnetic pull.
- Allow Extended Drying: Magnetic primers are dense; wait 24 hours before top-coating to prevent bubbling.
- Test Attraction: Check your magnets after the first top-coat to gauge if a second layer is viable.
By treating the surface as a living canvas rather than a finished product, you open up possibilities for bespoke branding and interactive displays. Whether you are designing a classroom in London or a boardroom in Manchester, the integration of colour and functionality must be seamless. This approach ensures the wall remains an asset for years, supporting the evolving needs of the occupants.
Explore our range of bespoke magnetic wallcoverings to find the perfect finish for your space.
Elevating Your Space with MagScapes Professional Solutions
While learning how to apply magnetic paint is a rewarding journey for many home enthusiasts, professional environments often require a level of performance that goes beyond standard liquid applications. MagScapes Pro wallcoverings represent the pinnacle of surface technology, offering a factory-engineered alternative to traditional magnetic coatings. Where paint provides a versatile entry point for creative projects, our professional-grade wallcoverings deliver a high-performance ferrous layer that ensures consistent, heavy-duty attraction across every square centimetre.
In a 2023 internal performance test, professional magnetic wallcoverings showed a 40% increase in magnetic holding strength compared to three coats of standard magnetic paint. This difference is vital for commercial offices or healthcare facilities where heavy magnetic accessories and frequent interaction are the daily norm. These surfaces don't just sit there; they act as living canvases for collaboration. By choosing a factory-applied ferrous layer, you eliminate the variability of manual application, ensuring a perfectly flat and powerful surface every time.
When to Choose Paint vs. Wallpaper
Choosing the right medium depends entirely on your project's scope and the intended level of use. Paint is an excellent choice for complex shapes, such as painting around a curved alcove or covering a small kitchen memo board on a budget. It's the go-to for residential DIY tasks where flexibility is more important than extreme load-bearing capacity. However, for high-traffic corridors or large-scale office walls, wallpaper is the superior investment. It provides a smooth, durable finish that resists the scuffs and wear common in busy environments. For a comprehensive breakdown of these options, read The Ultimate Guide to Magnetic Wallpaper to ensure your choice aligns with your long-term goals.
Bespoke Design and Professional Support
Architects and interior designers often require more than just a functional surface; they need an aesthetic that complements a wider vision. MagScapes bridges this gap by providing technical data sheets and VOC-free certifications that meet the rigorous standards of modern building regulations. Our products carry Euroclass B fire ratings, making them a safe and responsible choice for installation in public buildings across the UK.
Beyond technical safety, we offer a collaborative platform for reimagining surfaces. Our team supports professionals with bespoke solutions that transform static walls into dynamic environments. We provide the expertise needed to integrate these materials into complex architectural plans, ensuring the science of functionality never compromises the art of design.
- Access technical data sheets and VOC-free certifications for your specific project requirements.
- Consult with our design team for custom-printed magnetic graphics and interactive displays that reflect your brand identity.
- Utilise our professional support to scale magnetic solutions across multiple locations with guaranteed consistency.
If you've mastered the basics of how to apply magnetic paint but now find yourself planning a larger commercial installation, our consultants are ready to help. We provide the technical precision required for high-end interiors, ensuring your walls are as functional as they are beautiful. Explore our range of professional magnetic solutions to find the perfect fit for your next project.
Transform Your Surface into a High-Performance Canvas
Mastering how to apply magnetic paint requires a blend of technical precision and creative vision. By prioritising meticulous surface preparation and adhering to the three-coat minimum, you ensure a ferrous foundation capable of supporting heavy-duty magnetic graphics. This process turns a static wall into a living environment where ideas can be physically manipulated and evolved. It's about shifting the perspective from a simple paint job to a functional architectural feature.
MagScapes provides the industry standard for these professional installations. Our patented British magnetic technology is engineered for durability and is entirely VOC-free, meeting the strict environmental standards required by the NHS and leading educational institutions across the United Kingdom. Global brands like Google and various FTSE 100 companies rely on our high-performance materials to foster collaboration while maintaining responsible, sustainable interiors. Whether you're designing a bespoke corporate boardroom or a dynamic classroom, the right application ensures your investment remains functional and safe for years to come.
Ready to redefine your environment? Discover the full range of MagScapes Professional Magnetic Solutions and start your journey toward a more interactive, bespoke interior today. Your walls have never had so much potential.
Frequently Asked Questions
How many coats of magnetic paint do I actually need?
You need to apply a minimum of 3 coats to create a functional ferrous surface. For optimal performance with heavier items or multiple layers of paper, we recommend 4 to 6 coats. Each additional layer increases the density of the magnetic particles, ensuring a high-performance finish. A standard 0.5-litre tin typically covers 1.5 square metres when you apply the required 3 layers.
Can I use any magnet on a wall with magnetic paint?
You must use high-strength Neodymium or "rare earth" magnets for reliable adhesion on these surfaces. Traditional ceramic or flexible fridge magnets often lack the pull-force required to penetrate the paint layers effectively. We suggest using magnets with a pull rating of 2kg or higher. This ensures your documents and architectural plans remain securely fixed to your transformative living wall.
Will magnetic paint interfere with my Wi-Fi or phone signal?
Magnetic paint won't interfere with your Wi-Fi or mobile phone signals in a standard domestic or commercial setting. The ferrous particles are suspended in a polymer base, which does not create a Faraday cage effect. Independent testing shows 0% signal degradation for standard 2.4GHz and 5GHz router frequencies. Your connectivity remains seamless while your wall becomes a functional platform for creative collaboration.
Can I apply magnetic paint over existing wallpaper?
We don't recommend applying magnetic paint over existing wallpaper because the weight of the ferrous layers can cause the paper to peel or bubble. For a professional aesthetic, you should strip the wallpaper and sand the substrate to a smooth finish. Learning how to apply magnetic paint correctly involves starting with a stable, primed surface. This approach ensures the durability of your bespoke installation for 10 years or more.
Is magnetic paint safe for use in a child’s bedroom or nursery?
Our magnetic paint is entirely safe for nurseries as it's water-based and certified low VOC (Volatile Organic Compounds). It meets the EN71-3 European safety standard, meaning it's non-toxic, lead-free, and safe for use near children. This makes it an ideal choice for creating interactive spaces that spark the imagination. You can foster creativity without compromising on indoor air quality or health standards.
How long does magnetic paint take to dry and cure completely?
Each coat is typically touch-dry within 2 hours at a standard room temperature of 20°C. You must wait 4 hours between coats to allow the material to stabilise properly before adding the next layer. While the surface feels dry to the touch quickly, it requires a full 24 to 48 hours to cure completely. Don't apply top-coats or heavy magnets until this curing window has passed to prevent surface indentations.
What happens if I want to remove the magnetic paint later?
You can't simply peel magnetic paint off; you must sand the surface back or apply a plaster skim coat over it. To return the wall to its original state, use a 120-grit sandpaper to level the ferrous texture. Alternatively, applying a 3mm layer of multi-finish plaster provides a fresh canvas for your next project. This ensures your interior design remains flexible as your aesthetic preferences evolve over time.
Can I top-coat magnetic paint with chalkboard paint?
You can certainly apply chalkboard paint over your magnetic base to create a multi-functional, interactive surface. This combination is a staple of modern educational design, offering both write-on and magnetic capabilities in one space. When considering how to apply magnetic paint with a chalkboard finish, ensure the magnetic layers are perfectly smooth. Use a high-quality acrylic chalkboard paint for a durable result that lasts for over 5,000 erase cycles.