
Your walls are the most underutilised asset in your design. They stand as static boundaries when they could be dynamic, interactive canvases for collaboration and creativity. Transforming them is not just an aesthetic upgrade; it's a functional revolution.
We understand that the prospect of working with a high-performance, ferrous-lined material can feel intimidating. The weight of the roll, the choice of the correct high-tack adhesive, and the fear of a single misplaced cut on a material that can cost upwards of £150 per roll are all valid concerns for even seasoned installers. This guide removes the guesswork. We will provide you with the definitive professional method for how to install magnetic wallpaper, ensuring a flawless, bubble-free finish that lasts. You'll gain the confidence to handle these innovative materials with precision and unlock their full potential.
From meticulous wall preparation and adhesive selection to expert trimming techniques for perfect seams, we'll walk you through every critical step of the process.
Key Takeaways
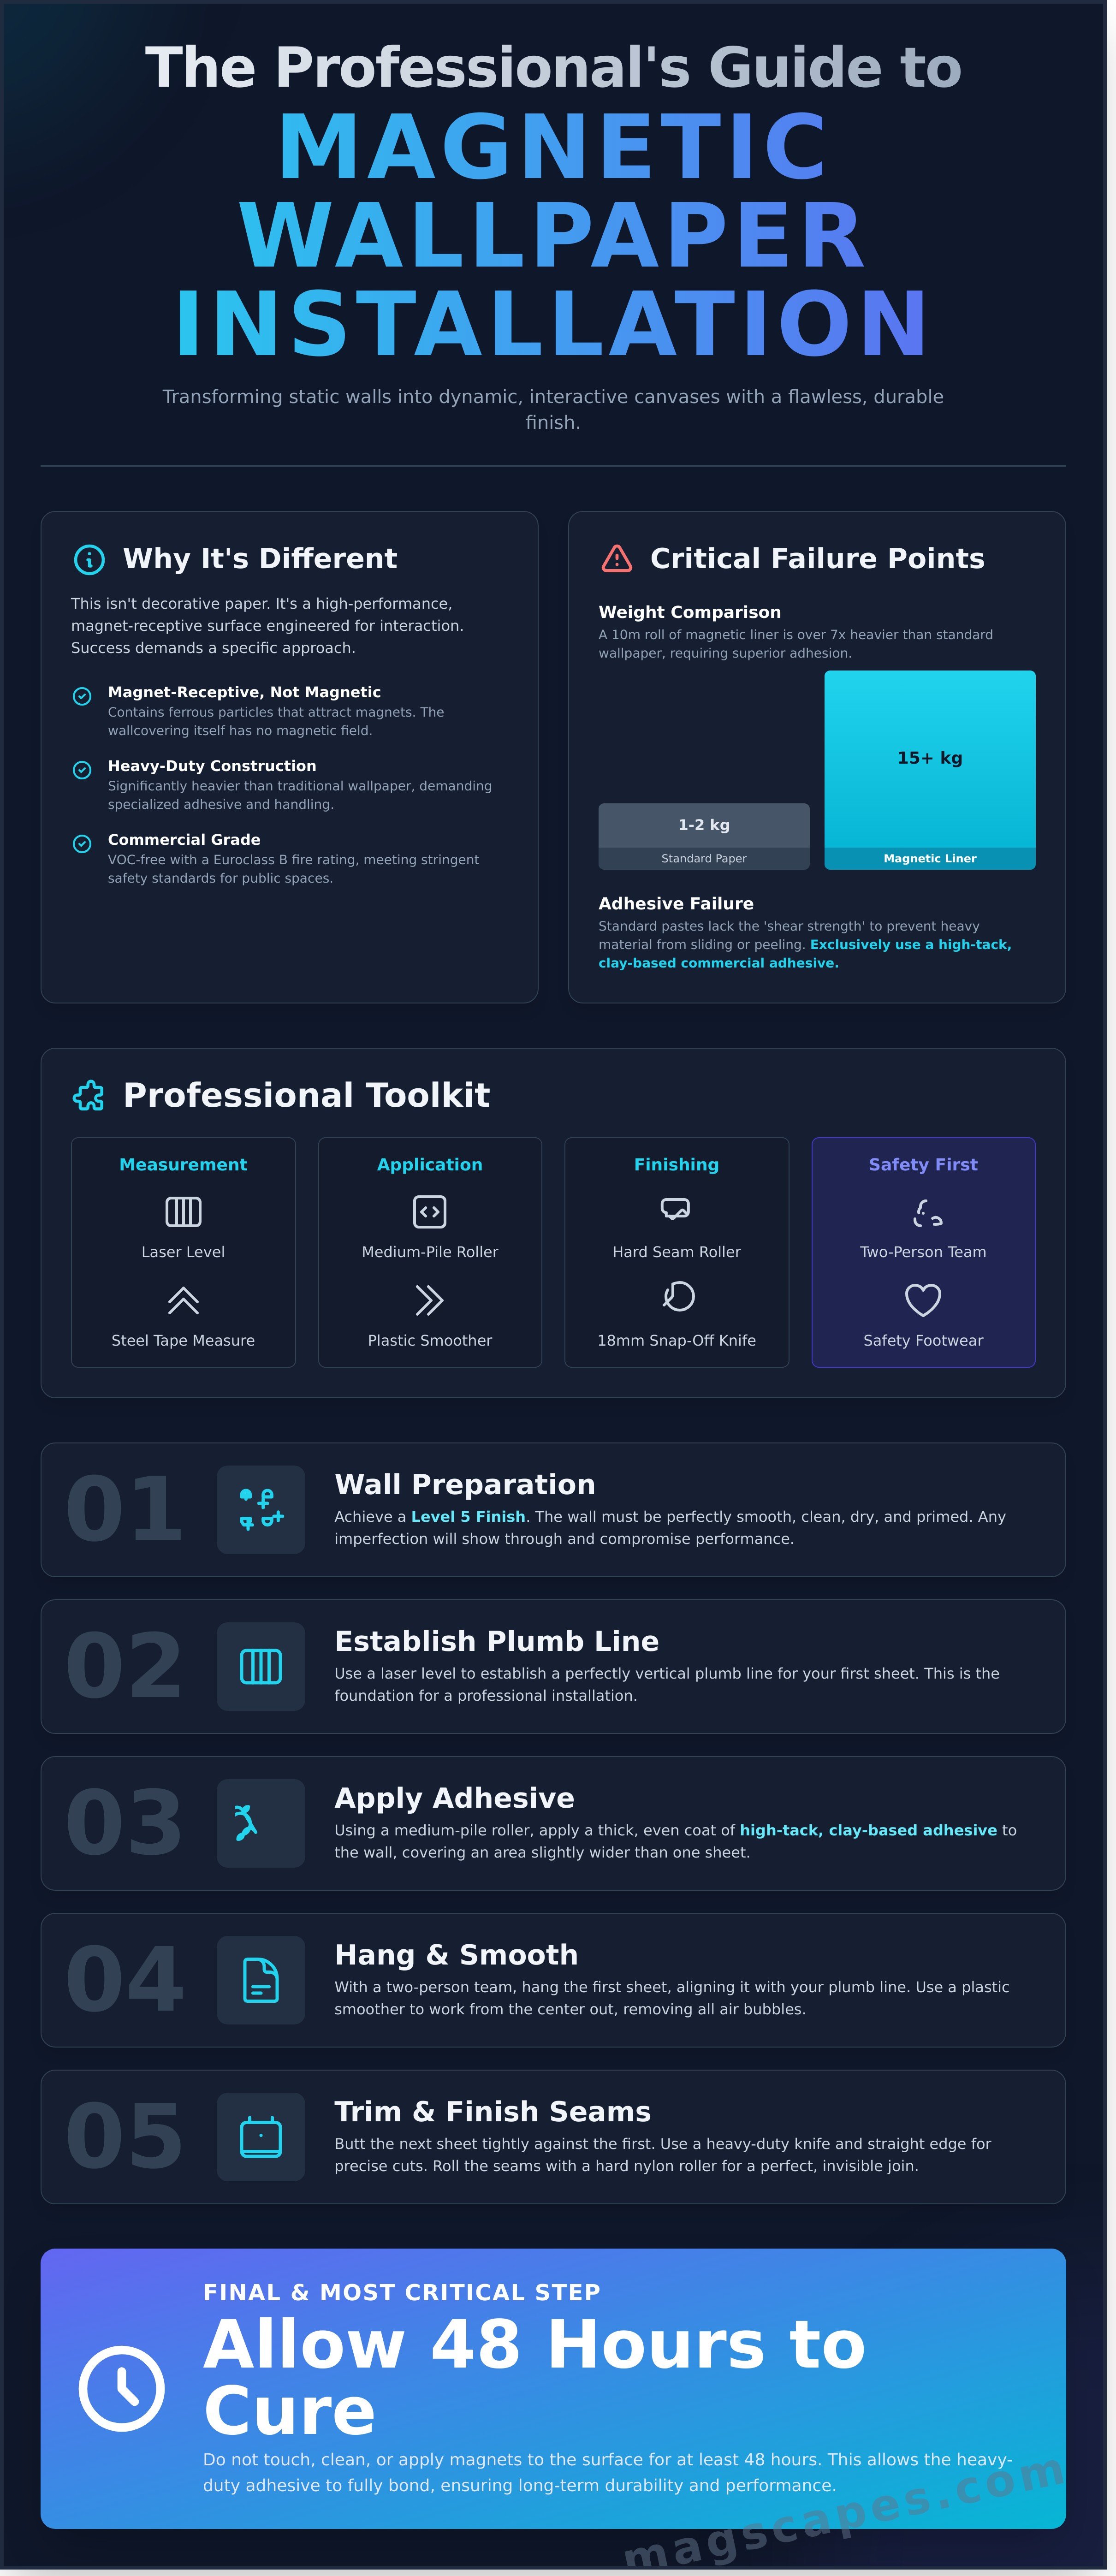
- Discover why a flawless Level 5 finish is the non-negotiable foundation for achieving a high-performance magnetic wall.
- Equip yourself with the essential professional toolkit, including specialised seam rollers, required for handling high-performance ferrous wallcoverings.
- Master the precision techniques for how to install magnetic wallpaper, from using a laser-leveled plumb line to applying high-grab adhesive correctly.
- Learn the critical 48-hour curing rule and post-installation care needed to guarantee the long-term interactivity and durability of your surface.
Understanding Ferrous Materials: Why Magnetic Wallpaper is Different
Before beginning any installation, it’s crucial to understand that professional magnetic wallpaper is a feat of material science, not a simple decorative covering. The first step in learning how to install magnetic wallpaper correctly is to discard the notion that the wallcovering itself is magnetic. It isn't. Instead, it’s a high-performance, magnet-receptive surface, engineered to transform a static wall into a dynamic, interactive canvas.
Unlike traditional wallpaper, which serves a purely aesthetic purpose, MagScapes wallcoverings are designed for interaction. This fundamental difference is rooted in their composition. We embed microscopic ferrous particles within a durable substrate, creating a surface that magnets are strongly attracted to. For a deeper insight into the science, Understanding Ferrous Materials clarifies that 'ferrous' denotes the presence of iron, the key element that gives our surfaces their unique receptive properties. This composition results in a product with a significantly higher weight-to-surface-area ratio. A standard 10m roll of decorative paper typically weighs 1-2 kg; a comparable roll of our magnetic liner can weigh over 15 kg. This weight demands an installation method focused on structural integrity, not just adhesion.
This is not a 'set and forget' finish. It’s a functional tool for collaboration, learning, and creativity. Therefore, the installation must be robust enough to withstand daily use: the constant application and removal of magnets, the weight of displayed documents, and active engagement. For commercial environments across the United Kingdom, from corporate boardrooms to NHS hospital wards, material specification is non-negotiable. Our products are VOC-free and carry a Euroclass B fire rating, ensuring they meet the stringent safety and environmental standards required for public and commercial spaces.
The Science of Magnet-Receptive Surfaces
The performance of a magnet-receptive wall is a direct result of its material density and thickness. The higher the concentration of ferrous particles, the stronger the magnetic pull. Our MagScapes Pro line, at 0.7mm thick, provides over 35% greater magnetic receptivity than the 0.4mm Lite version. This increased thickness, however, also increases the material's weight and rigidity, making the handling and installation process a more demanding task reserved for professional application.
Why Standard Adhesives Often Fail
The single greatest point of failure in a poor installation is the adhesive. Traditional ready-mixed wallpaper pastes are formulated for lightweight papers and lack the 'shear strength' required to hold a heavy wallcovering in place. Shear strength is the adhesive's capacity to resist the downward gravitational pull that causes a heavy material to slide or peel. Standard pastes can fail within 24 hours under the load of a ferrous liner. Furthermore, their high water content can potentially compromise the ferrous particles if applied to an improperly sealed or primed surface. We exclusively recommend a high-performance, clay-based adhesive formulated for heavy commercial wallcoverings, which provides the immediate, high-tack bond necessary to secure the material permanently.
The Essential Toolkit for Magnetic Wallcovering Installation
A truly transformative finish doesn't happen by chance; it's the direct result of precision, skill, and an expertly curated set of tools. While a standard decorating kit offers a starting point, the unique composition of high-performance magnetic wallcoverings demands specialist equipment to achieve a flawless, professional result. Understanding how to install magnetic wallpaper begins with assembling the right toolkit. A comprehensive checklist of essential wallpaper tools provides a solid foundation, but the weight and ferrous nature of our materials require a few critical upgrades.
Before you begin, gather these essentials:
- Precision Measurement: A laser level and a high-quality steel tape measure.
- Application & Smoothing: A medium-pile roller or notched trowel, a flexible plastic smoothing tool, a zinc-plated spatula, and a hard nylon seam roller.
- Cutting: A heavy-duty 18mm snap-off blade knife and a 1.5m anodised aluminium straight edge.
Finally, consider safety. Large format MagScapes Pro rolls can weigh upwards of 20kg. We always recommend a two-person team for handling and installation, along with appropriate safety footwear to prevent injury. Your workspace should be clean, organised, and ready for a seamless workflow.
Specialized Cutting Tools
The integrated ferrous layer that gives our wallcoverings their magnetic power also presents a unique challenge for cutting. Standard decorating blades will dull almost instantly, leading to tearing, snagging, and an imperfect seam. You need professional-grade, heavy-duty snap-off blades to slice cleanly through the material. We recommend the 'frequent blade change' rule: snap off a segment for every single vertical cut. This ensures every edge is perfectly sharp and every seam is invisible. Paired with a heavy-duty straight edge, this technique guarantees the precision required for a truly architectural finish.
Adhesive Application Tools
Due to their substantial weight, all our magnetic wallcoverings are installed using the 'paste-the-wall' method. This technique ensures the wall bears the load of the adhesive, preventing the material from stretching or becoming saturated. Your choice of application tool depends on the recommended adhesive. A medium-pile roller (typically 9-inch) is perfect for evenly distributing a ready-mixed tub adhesive, while a V-notched trowel is specified for certain high-tack vinyl adhesives. Once the wallcovering is on the wall, use a flexible plastic smoother to work from the centre outwards, eliminating air pockets. For tight corners and edges, a firm but flexible zinc-plated spatula is invaluable. Crucially, a hard nylon seam roller is non-negotiable for pressing seams firmly together, ensuring a durable bond without polishing the surface.
With your tools assembled, the next critical element is the bonding agent itself. The right adhesive is not just a recommendation; it's a structural necessity for long-term performance. For bespoke projects or complex specifications, you can always consult the technical data sheets for your chosen wallcovering. The perfect pairing of tools and adhesive is foundational to creating a dynamic, interactive surface that will inspire for years to come. We explore this vital component next in our section on [Choosing the Right Adhesive for Wallcoverings].
Surface Preparation: The Critical Foundation
A truly transformative magnetic wall is not merely applied; it is engineered from the substrate up. Unlike traditional wallcoverings, the high-performance nature of magnetic wallpaper demands a flawless surface. Its weight, due to integrated ferrous particles, and its function, which relies on absolute surface contact, mean that preparation is not a preliminary step. It is the most critical phase of the entire installation.
For this reason, we specify a Level 5 drywall finish as the minimum professional standard. This is the highest quality finish available, where the entire wall surface receives a thin skim coat of joint compound, creating a perfectly uniform, glass-smooth plane free of any texture or imperfection. A standard Level 4 finish, common in many UK residential projects, will inevitably telegraph its subtle flaws through the wallpaper, creating visual blemishes and, more critically, minute gaps that can weaken magnetic attraction by up to 15% in localised spots. The ultimate guide on how to install magnetic wallpaper successfully begins with an uncompromising commitment to the surface.
For an even more robust and stable installation, professional decorators employ a technique known as ‘cross-lining’. This involves hanging a high-quality lining paper (1200 grade or higher) horizontally before the magnetic wallpaper is installed. This traditional method provides three distinct advantages: it stabilises the substrate, it absorbs excess moisture from the adhesive evenly, and it masks any final, minuscule imperfections on the wall, ensuring a truly monolithic final appearance. For a detailed breakdown of every requirement, please consult our comprehensive Preparing Your Walls for a Perfect Finish checklist.
Cleaning and Degreasing the Substrate
Before any application, the wall must be meticulously cleaned. Any contaminants, from fine construction dust to grease or residual adhesive from previous coverings, will compromise the ‘grab’ of the specialist adhesive. We recommend a solution of sugar soap, followed by a clean water rinse. Test the wall’s porosity by flicking water onto it; if it soaks in within 60 seconds, the surface is too porous and requires sealing. Finally, feel the wall by hand to identify and sand down any ‘high spots’ or nibs.
Priming for Ferrous Materials
A high-quality, acrylic-based primer is non-negotiable. Its primary role is to create an impermeable barrier, preventing moisture from the adhesive from reacting with the ferrous particles in the wallpaper and causing oxidation. Allow the primer to cure fully, which can take up to 24 hours, not just until it's touch-dry. Rushing this stage is a primary cause of installation failure. To be certain, perform the ‘pencil test’: a sharp 2H pencil drawn lightly across the surface should leave a clean line, not a scratch, indicating the primer is sufficiently hard.
Step-by-Step Guide to Hanging Magnetic Wallpaper
This is the transformative stage where your prepared surface becomes a dynamic, functional canvas. The weight and high-performance nature of magnetic wallpaper demand precision. Unlike standard wallcoverings, there is less room for error, but the result is an unparalleled aesthetic and interactive experience. Following a methodical process is the key to a flawless, professional finish.
Your first line dictates the success of the entire project. Begin by establishing a perfectly vertical plumb line using a laser level. For a material of this substance, a traditional plumb bob or spirit level lacks the required accuracy; a deviation of just 2mm at the start can become a conspicuous 1cm gap by the end of a wall. Project the laser line approximately 500mm from the starting corner, which is slightly less than the width of a standard roll, allowing for precise alignment.
Using a high-quality, ready-mixed, high-grab adhesive is non-negotiable. We recommend a tub vinyl adhesive designed for heavy-contract wallcoverings. Apply it directly to the wall using a medium-pile roller, a technique known as ‘paste-the-wall’. Be generous. You are aiming for a consistent, wet film that the wallpaper can bond with instantly. Work in sections, pasting an area slightly wider than the roll you are about to hang.
Handling and Positioning Heavy Rolls
A standard 10-metre roll of MagScapes magnetic wallpaper can weigh over 12kg, making this a two-person task. One person should support the weight of the roll from below while the other guides the top edge into position. This cooperative approach prevents the material from kinking or stretching, which can permanently damage the internal ferrous layer. When approaching corners, never create a sharp fold. Instead, use a decorator’s sponge to gently ‘work’ the material into the corner, preserving its integrity and ensuring a smooth transition.
Mastering the Seams and Edges
For a truly seamless aesthetic, the 'double-cut' method is the industry standard for how to install magnetic wallpaper. Hang your second drop, overlapping the first by 50mm. Using a decorator's straight edge and a fresh, sharp blade, cut vertically through both layers of wallpaper at the centre of the overlap. Carefully peel away the trimmed offcut from the top layer, then lift the edge and remove the corresponding strip from the bottom layer. The two edges will now meet perfectly. Use a hard plastic seam roller to apply firm pressure along the join, creating a permanent, invisible bond that will not lift over time.
When trimming around fixtures like light switches or sockets, ensure the mains power is switched off at the consumer unit. Hang the wallpaper directly over the fitting. Make a small cross-shaped incision over the centre of the socket with your knife, then carefully trim outwards, leaving about 5mm of excess material to tuck behind the faceplate for a clean, surgical finish.
- Step 1: Align the First Drop: Unfurl the first panel and align its edge with your laser plumb line. Leave a 50mm excess at the ceiling and skirting board for trimming.
- Step 2: Smooth for Full Contact: Working from the centre outwards, use a plastic wallpaper smoother to eliminate all air tension. This ensures 100% adhesive contact, which is vital for magnetic performance.
- Step 3: Join and Cut: Hang the subsequent drops using the double-cut method described above for a flawless, professional join every time.
- Step 4: Final Trimming: Once the adhesive is tacky (usually after 20-30 minutes), use a sharp blade and a straight edge to trim the excess at the ceiling, skirting, and around fixtures.
Executing these steps with care and precision will transform your space. For a complete solution, explore our professional installation kits, which contain the specialist tools and high-grab adhesive required for a perfect result.
Finishing, Curing, and Post-Installation Care
The final stage of your installation is not an end, but a transformation. Your static wall is now poised to become a dynamic, interactive canvas. This transition, however, requires a period of patience and meticulous attention. The next 48 hours are critical for ensuring the longevity and flawless performance of your new MagScapes surface, transforming a successful installation into an enduring asset.
Immediately after hanging the final drop, conduct a thorough visual inspection. Look for any 'micro-bubbles' that may have appeared. These tiny pockets of trapped air can often be addressed within the first 30-60 minutes before the adhesive begins to set. Using a flexible plastic smoother wrapped in a soft, lint-free cloth, apply gentle, even pressure from the centre of the bubble outwards to expel the air. Once the surface is perfectly smooth, use a separate damp sponge and clean water to meticulously wipe away any residual adhesive from the seams and face of the wallpaper. This prevents a hazy or glossy residue from marring the final aesthetic.
The most crucial step in this final phase is adhering to the '48-hour rule'. You must wait a full two days before applying any magnets, accessories, or (for MagWrite surfaces) dry-erase markers. Curing is the chemical process where the adhesive fully bonds with the wall and the wallcovering, achieving its maximum structural integrity over a 24-48 hour period. Introducing pressure or chemical agents during this time can compromise this bond, leading to lifting or surface imperfections. This waiting period is the ultimate guarantee of a professional finish, ensuring the wall is fully prepared for years of interaction.
The Curing Process
A stable environment is key to a perfect cure. The ideal ambient conditions are a consistent room temperature between 18°C and 22°C with a relative humidity below 65%. Resist the temptation to accelerate the process with 'forced drying'. Using portable heaters or dehumidifiers can cause the wallpaper's seams to dry faster than the centre of each panel, creating tension that may lead to visible seam shrinkage. Natural, gentle air circulation is always the superior method for a uniform bond. For commercial handovers, a final inspection checklist ensures every detail meets our exacting standards:
- Seam Integrity: All seams are tight, flat, and perfectly aligned with no lifting or gaps.
- Surface Finish: The entire surface is free of bubbles, wrinkles, and dried adhesive residue.
- Edge Adhesion: A gentle press along all perimeters and corners confirms a secure, complete bond.
Long-term Maintenance of Interactive Walls
Your MagScapes wall is a high-performance surface designed for durability, and its care protocol is straightforward. For MagWrite dry-erase surfaces, daily cleaning with a microfibre cloth is recommended. For stubborn ink residue or 'ghosting', use a dedicated whiteboard cleaning fluid; avoid all-purpose sprays, as their chemical solvents can degrade the finish over time. For MagPrint graphic walls, simply wipe the surface with a soft cloth lightly dampened with water and a pH-neutral cleaning agent. Never use abrasive powders, scouring pads, or harsh chemicals on any MagScapes product, as this can permanently scratch the bespoke finish.
With the installation and curing complete, your surface is now ready to inspire. The final step in learning how to install magnetic wallpaper is activating its potential. Now that your wall is prepared for engagement, you can explore the best tools for the job. Discover how to select the most effective accessories in our guide, Choosing the Right Magnets for Your Wall.
Transform Your Walls into Interactive Canvases
You've now moved beyond simple instruction and into the realm of professional application. From understanding the critical importance of impeccable surface preparation to the final, satisfying sweep of the smoother, you possess the complete framework for how to install magnetic wallpaper. This meticulous process ensures your wallcovering isn't just applied, but perfectly integrated, creating a seamless, high-performance surface that is as durable as it is dynamic.
Now that the 'how' is clear, the 'what' becomes the focus. For over 18 years, since pioneering our patented magnetic technology in 2006, MagScapes has been the trusted partner for transformative interiors, specified by leading global brands in tech, education, and healthcare. We don't just supply an innovative product; we offer a complete platform for your creativity with bespoke design and printing services tailored to your aesthetic and functional requirements.
Your vision for a living, breathing wall is within reach. It's time to build something extraordinary. Explore the MagScapes Pro Collection for your next project and discover the potential of a truly interactive space.
Frequently Asked Questions About Installing Magnetic Wallpaper
Can I install magnetic wallpaper over existing wallpaper?
No, you cannot install magnetic wallpaper over existing wallpaper. For a flawless, professional bond, the wall surface must be perfectly clean, smooth, and properly prepared. Existing wallpaper can hide imperfections and will compromise the adhesion, leading to a poor finish. The first critical step in our guide on how to install magnetic wallpaper is always to strip the wall back to a sound surface and prime it for optimal, long-lasting results.
Do I need a special type of adhesive for MagScapes Pro?
Yes, MagScapes Pro requires a specific adhesive to support its weight and ensure high performance. We mandate the use of a high-quality, ready-mixed, heavy-duty tub adhesive formulated for contract-grade wallcoverings. Standard wallpaper paste simply lacks the required solids and initial tack to create a permanent bond with our ferrous liner. Using the correct adhesive is a non-negotiable step for a successful installation and enduring durability.
Will the magnetic wall interfere with my Wi-Fi or office electronics?
No, our magnetic wallpaper will not interfere with your Wi-Fi, mobile signals, or office electronics. The wallcovering is magnetically receptive, not an active magnet. It contains fine ferrous particles that attract magnets but does not emit its own magnetic field or any electromagnetic radiation. It’s a completely passive system, designed to integrate seamlessly into a modern, connected workspace without causing any digital disruption.
Can I paint over magnetic wallpaper once it is installed?
Yes, you can absolutely paint over our magnetic wallpaper to create a truly bespoke, functional surface. This allows you to match any colour palette while retaining the wall's magnetic interactivity. For best performance, apply no more than two thin coats of a high-quality emulsion paint. While painting can slightly reduce the magnetic pull, using strong neodymium magnets will ensure you can still hold heavier items effectively.
How do I remove magnetic wallpaper if I move offices?
Removing our magnetic wallpaper is a process best handled like any professional-grade contract wallcovering. It typically requires scoring the surface to allow steam penetration, followed by the use of a wallpaper steamer to soften the heavy-duty adhesive. The wallpaper will then peel away in sections. As is standard for high-performance wallcoverings, some minor filler and sanding may be needed to restore a perfectly smooth surface for your next design.
Is magnetic wallpaper fire-rated for use in hospitals and schools?
Yes, MagScapes magnetic wallpaper is fully certified for commercial environments. It proudly achieves a Euroclass B-s1, d0 fire rating, compliant with the BS EN 13501-1:2018 standard. This high-performance classification makes it a safe and approved choice for installation in public spaces with the most stringent safety regulations, including UK hospitals, schools, universities, and corporate offices, ensuring both design innovation and peace of mind.
Can I install this in a bathroom or high-humidity area?
We do not recommend installing magnetic wallpaper in bathrooms or areas with sustained high humidity. Persistent exposure to moisture and steam can eventually compromise the integrity of the adhesive bond and the wallcovering itself. While the surface is highly durable and wipeable for general use, it is not engineered for direct water contact or challenging environments like shower rooms or unventilated kitchens. It performs best in climate-controlled interior spaces.
What happens if I get bubbles in the wallpaper after it dries?
If a small bubble appears after the adhesive has cured, it can be easily remedied. This is typically caused by a tiny pocket of trapped air. To resolve this, take a fine hypodermic needle and carefully make a small puncture at the edge of the bubble. Then, using a plastic wallpaper smoother, gently press the trapped air out through the pinprick. The wallpaper will flatten against the wall, leaving a seamless, professional finish.