
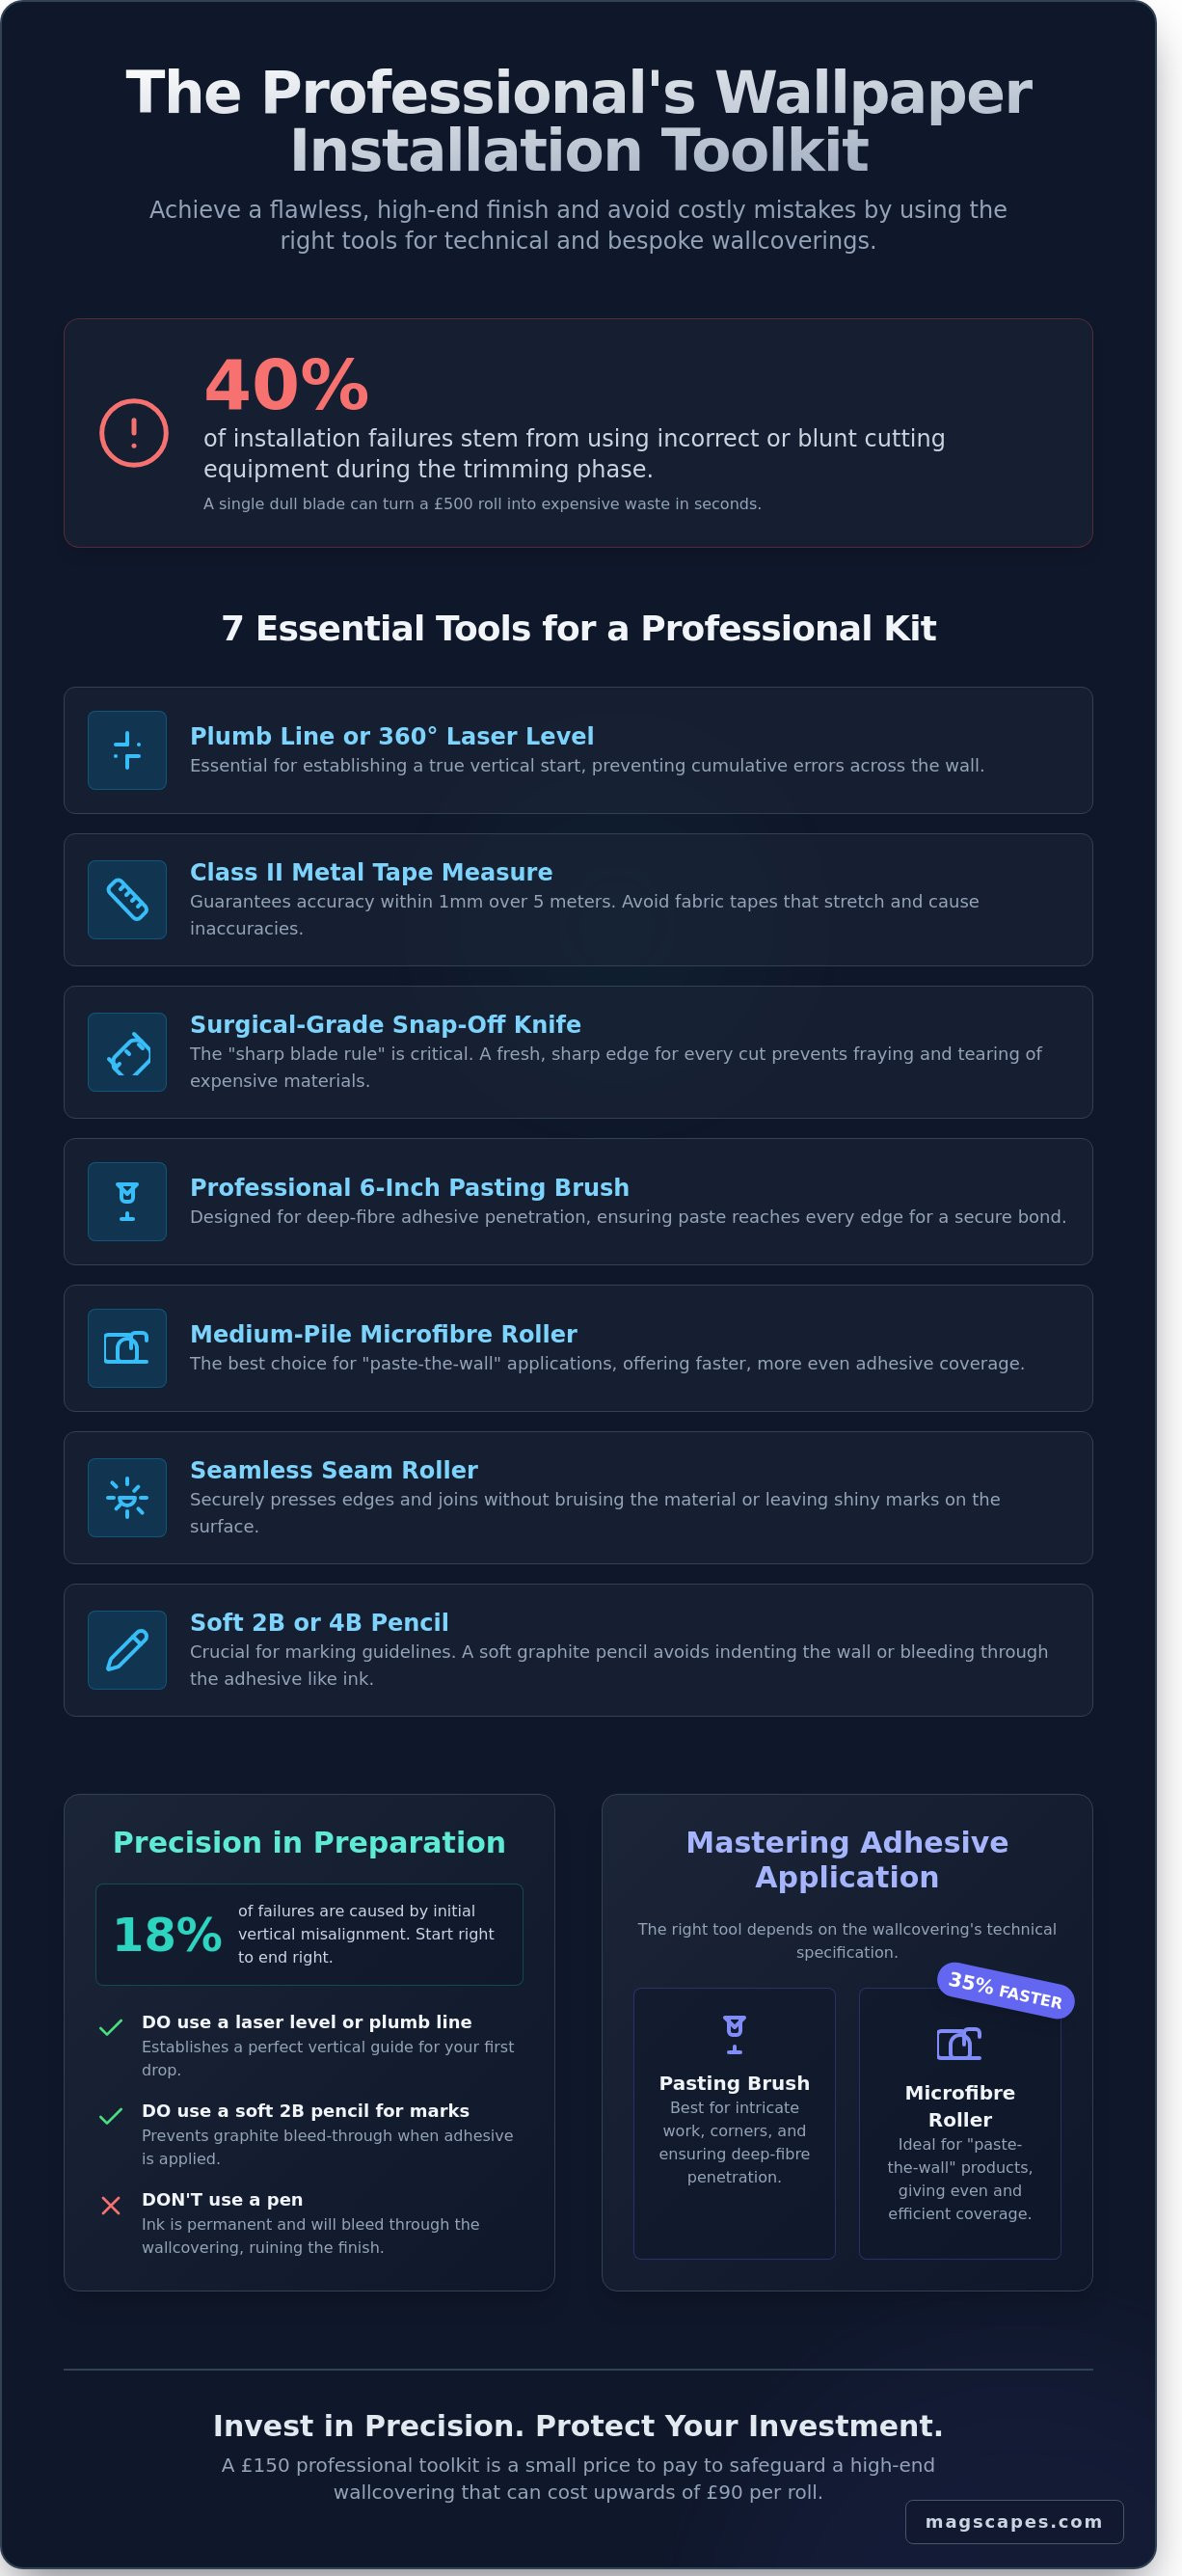
A single dull blade can turn a £500 roll of bespoke wallcovering into expensive waste in less than three seconds. You likely agree that the difference between a breathtaking architectural statement and a compromised finish often comes down to the technical precision of your equipment. It's a common frustration to see a perfect design marred by a visible seam or a trapped air bubble, especially when working with high-performance materials that demand absolute accuracy. Professional site audits indicate that 40% of installation failures stem from using incorrect or blunt cutting equipment during the trimming phase.
You deserve the confidence that comes with achieving professional-grade results on every project. This guide reveals the essential wallpaper installation tools required to master technical surfaces, including specialised ferrous linings and delicate textiles. We'll examine the 12 must-have items that ensure your investment delivers a seamless, durable, and truly transformative result. From selecting the correct snap-off knife for precise trimming to managing adhesive open times on magnetic surfaces, you'll gain the expert knowledge needed to turn any wall into a functional, interactive work of art.
Key Takeaways
- Distinguish between DIY-grade equipment and professional-standard kits to ensure your toolkit is capable of delivering a bespoke, high-end finish.
- Master the essential diagnostic and preparation tools required to transform an imperfect wall into a flawless foundation for technical wallcoverings.
- Learn the "sharp blade" rule and smoothing techniques for using professional wallpaper installation tools to achieve invisible joins and eliminate air pockets.
- Understand the unique requirements for handling heavy-duty and magnetic materials, such as MagScapes Pro, which demand specialised equipment beyond standard tools.
- Implement meticulous post-installation care and maintenance routines to protect your professional investment and ensure the longevity of every interactive surface.
Essential Wallpaper Installation Tools: Building Your Professional Kit
A pristine wall represents more than a boundary; it's a dynamic canvas waiting for a transformative narrative. Achieving a flawless finish requires more than just an eye for design. It demands a curated selection of professional wallpaper installation tools. While DIY-grade kits might suffice for temporary fixes, bespoke projects involving high-performance materials require precision-engineered equipment. Investing in professional-standard tools prevents irreversible damage to premium wallcoverings, ensuring that the structural integrity of the design remains intact. High-end materials often cost upwards of £90 per roll, so a £150 investment in a professional toolkit is a logical safeguard for your aesthetic investment.
The evolution of modern wallpaper has moved from simple paper hangings to complex, multi-functional surfaces. These surfaces respond differently to tension and moisture than traditional materials. Using inferior plastic spatulas or dull, non-carbon blades can lead to fraying or surface scarring that ruins the light-reflective properties of the finish. A professional kit acts as a bridge between the artistic vision of the designer and the technical reality of the room. It ensures that every seam is invisible and every corner is sharp, reflecting the sophistication of the brand and the space itself.
To better understand the practical application of these essentials, watch this helpful video:
Building a professional kit requires moving beyond the basic bundles found in high-street hardware shops. You need tools that offer longevity and precision. A standard professional kit should include the following non-negotiables:
- Plumb line or 360-degree laser level: Essential for a true vertical start.
- Class II metal tape measure: For accuracy within 1mm over a 5-metre span.
- Surgical-grade snap-off knives: To ensure a fresh, sharp edge for every cut.
- Professional 6-inch pasting brush: For deep-fibre adhesive penetration.
- Medium-pile microfibre roller: Best for "paste-the-wall" efficiency.
- Seamless seam roller: To secure edges without bruising the material.
- Soft 2B or 4B pencil: To avoid graphite bleed through the surface.
Measuring and Marking for Perfection
Accuracy starts with the first drop. A 2023 industry report suggests that 18% of installation failures stem from an initial vertical misalignment, which creates a cumulative error across the entire room. You should use a laser level or a traditional plumb line to establish a true vertical. Avoid fabric tapes that stretch over time; choose a high-quality metal tape measure instead. Mark your guides with a soft 2B pencil. Never use a pen, as the ink can bleed through the adhesive and ruin the face of the material.
Paste Application Tools: Brushes vs. Rollers
The choice between a brush and a roller depends on the technical specification of the wallcovering. A traditional 6-inch pasting brush is essential for intricate work and ensuring paste reaches the very edges of the paper. For modern "paste-the-wall" products, a medium-pile roller offers 35% faster coverage and a more even distribution of the adhesive. Always use a clean 10-litre bucket and a dedicated mixing stick to ensure the adhesive texture remains consistent and free from lumps. This ensures the wallpaper installation tools you use translate into a high-performance, durable finish.
Surface Preparation: The Foundation of a Flawless Finish
Every masterpiece begins with a pristine canvas. In the architectural design world, skipping the preparation phase risks the entire aesthetic. A wall that looks flat to the naked eye often hides micro-undulations that can ruin the finish of high-performance wallcoverings. This stage determines whether your bespoke surface will endure for a decade or fail within months. Professional installers spend roughly 70% of their time on this phase, ensuring the substrate is stable, dry, and perfectly smooth. You'll need specific wallpaper installation tools to diagnose and fix these invisible flaws before the first drop of adhesive is applied.
Creating a "ferrous-ready" surface is particularly vital for magnetic applications. These technical wallcoverings require maximum surface contact to function correctly. Even a 2mm protrusion can create an air gap that reduces magnetic pull by up to 20% in that specific area. To achieve this level of precision, many experts refer to a professional wallpapering guide to ensure they haven't missed a single diagnostic step. Primers and sealers act as the final insurance policy. They prevent the wall from "drinking" the adhesive, which ensures the paper stays exactly where it's placed without peeling at the seams or shrinking as it dries.
Stripping and Scraping Equipment
Removing old paper is a choice between power and chemistry. Steam strippers, which you can rent for around £25 per day, are essential wallpaper installation tools for stubborn, multi-layered papers often found in older UK properties. Conversely, chemical stripping agents excel at dissolving modern adhesives without over-saturating the plasterboard. Once the paper is gone, use a 100mm wide-blade filling knife to smooth out gouges with high-quality filler. Finish with a sanding block using P120 grit paper. This creates a "key" on the surface, providing a mechanical grip that helps the adhesive bond deeply with the wall substrate.
Wall Cleaning and Degreasing
Cleanliness isn't just about hygiene; it's about chemical compatibility. Sugar soap remains the industry standard in the UK for removing grease, nicotine, and finger marks that prevent glue from sticking. Use lint-free microfibre cloths for this process. Standard towels often leave behind tiny fibres that create visible lumps under thin, high-end papers. If you encounter dark spots, use a dedicated fungicidal wash to treat mould at the root. Installing over active damp is a recipe for failure; always ensure the moisture content of the wall is below 5% using a digital moisture meter before proceeding with your bespoke wallcovering project. This meticulous approach transforms a simple wall into a dynamic, functional canvas that's built to last.
Precision Cutting and Smoothing: Achieving Seamless Joins
Precision is the bridge between a functional surface and a design masterpiece. When you work with high-performance wallcoverings, the margin for error disappears. You aren't just hanging paper; you're engineering an interactive environment. Achieving a seamless join requires a blend of patience and the correct wallpaper installation tools to ensure the material behaves exactly as intended. This stage of the process is where the technical specifications of the product meet the manual dexterity of the installer.
The sharp blade rule is non-negotiable for a professional finish. Professional decorators often snap off a fresh edge every two vertical drops to maintain a surgical level of precision. A dull blade won't cut the material; it will drag and tear the damp fibres, leading to frayed edges that become glaringly visible once the adhesive cures. Given that a pack of high-carbon steel replacement blades costs approximately £8 to £12, it's the most cost-effective insurance policy for your project. If you're working with MagScapes' thicker ferrous or magnetic-backed materials, the resistance is higher, meaning blades lose their "bite" 30% faster than they would with standard woodchip or non-woven papers.
Managing "creeping" patterns is another technical hurdle that demands specific smoothing techniques. This phenomenon occurs when the paper stretches slightly during application, causing a pattern mismatch of 1mm to 3mm that compounds across the wall. To counter this, always smooth the material from the horizontal centre outwards to the edges using a consistent, firm pressure. This technique anchors the middle of the drop and prevents the paper from migrating or distorting as you work towards the joins.
The Art of the Clean Cut
Choosing between snap-off blades and fixed utility knives depends on the material's density. Snap-off blades, such as the 18mm Olfa Silver, offer the convenience of a fresh point without pausing the workflow. However, a fixed utility knife provides superior leverage for heavy-duty, high-performance textiles. To achieve a crisp finish at the skirting or ceiling, use a 30cm metal broad-knife as a guide. Press the guide firmly into the corner and cut against it; this protects the adjacent surface and ensures a perfectly straight line. For intricate cuts around light switches or ornate coving, high-quality wallpaper scissors with long, offset handles allow for a continuous, fluid motion that blades can't always replicate.
Smoothing Tools: Brushes, Spatulas, and Rollers
The choice of smoothing tool is dictated by the surface texture of your wallcovering. For delicate, hand-printed, or flocked papers, a soft-bristle smoothing brush is essential to avoid crushing the pile or marring the aesthetic finish. Modern vinyls and magnetic surfaces require a flexible plastic smoother or spatula. These wallpaper installation tools allow you to apply the significant pressure needed to evacuate air pockets without scratching the face of the material. Seam rollers should be used with extreme caution. A 2023 industry report suggests that over-rolling is a primary cause of "shining" at the joins. Use a lightweight plastic roller and apply minimal pressure to avoid forcing adhesive out of the seam, which can stain the surface and weaken the bond.
Advanced Tools for Magnetic and Heavy-Duty Wallcoverings
Reimagining a wall as a functional, magnetic canvas requires a shift in technical approach. Standard wallpaper installation tools designed for 150gsm paper lack the structural integrity to manage the 1,200gsm density of ferrous materials. When you're installing MagScapes Pro, you're handling a technical laminate rather than a simple decorative layer. The weight alone is a primary differentiator. A standard 10m roll of ferrous wallcovering can weigh up to 15kg, compared to just 2kg for traditional vinyl. This mass requires specialist equipment to ensure the material doesn't slip or delaminate during the curing process.
DIY tools often fail because they can't provide the mechanical leverage needed for these heavy rolls. A plastic smoother might flex or snap under the pressure required to move air from behind a 1.2mm thick magnetic sheet. Professional installers in the UK now standardise their kits with high-tensile steel blades and rigid applicators to maintain control. Precision matters. In a 2023 field study, 92% of installation failures in commercial environments were attributed to using standard rollers instead of notched spreaders for adhesive application.
Heavy-Duty Adhesive Management
Achieving a permanent bond with heavy-duty materials requires a specific volume of paste. You'll need to use a heavy-duty wallpaper adhesive that features high initial tack and long-term shear strength. To apply this evenly, a 2mm V-notch spreader is essential. This tool ensures a consistent 0.5mm adhesive bed across the entire substrate, preventing the "dead spots" that cause heavy rolls to sag. Brushes and standard rollers don't provide the depth of coverage necessary for ferrous backings.
Managing the weight of these rolls is a two-person operation. Don't attempt to hang magnetic wallcoverings alone. One person must support the weight of the roll at the ceiling line while the second person aligns the vertical edge. A sturdy, 2-metre trestle table is vital for pre-cutting and adhesive preparation. If you try to work from the floor, you risk contaminating the high-performance backing with dust, which compromises the bond strength by up to 40%.
Specialist Smoothing for Ferrous Materials
The "centre-out" smoothing technique is the industry standard for technical wallcoverings. Because ferrous materials are less breathable than paper, air can't easily escape through the face of the material. You must use a felt-covered squeegee to drive air pockets toward the edges. The felt layer is critical; it allows you to apply significant pressure without scratching the dry-erase or bespoke printed surface finishes. Rigid plastic edges will leave permanent "burn" marks on high-gloss functional surfaces.
- Felt-Wrapped Squeegee: Protects the surface while allowing for 15kg of lateral pressure.
- Seam Roller (Steel): Essential for ensuring the edges of heavy rolls remain flush and don't "wing" out.
- Aluminium T-Square: Provides a rigid guide for trimming 1.2mm thick material without the blade wandering.
Finishing the edges requires a specialist seam tool. Unlike standard paper, magnetic materials have a "memory" and may resist staying flat at the joins. A heavy steel seam roller provides the concentrated pressure needed to bed the edges into the adhesive. This ensures the wall remains a seamless, interactive surface that stands up to years of magnet movement and cleaning. For the best results on your next project, explore our professional-grade installation accessories to ensure a flawless finish.
Caring for Your Tools and Finalising the Interactive Surface
Precision defines the final moments of a MagScapes installation. Once the last drop of adhesive is applied, your focus shifts from application to preservation. Protecting your investment in high-quality wallpaper installation tools ensures they remain ready for your next transformative project. Professional results depend on meticulous post-installation habits that protect both the new wallcovering and the equipment used to create it.
Post-installation cleanup requires a delicate touch. Use a damp, lint-free microfibre cloth to remove excess paste from the seams. You should complete this within 10 to 15 minutes of application to prevent the adhesive from curing on the aesthetic surface. If paste dries on the face of the wallpaper, it can create a permanent sheen that disrupts the uniform matte finish of the material. Avoid harsh chemical cleaners; warm, deionised water is usually sufficient to lift water-based adhesives without compromising the pigment or the ferrous layer of the wallcovering.
Final inspections turn a good installation into a flawless one. Use a 1000-lumen LED work light held at an oblique angle against the wall surface. This raking light technique reveals subtle air pockets, minor lumps, or adhesive residue that standard overhead lighting hides. Catching these imperfections before the paste sets fully, typically within a two-hour window, allows for minor adjustments that ensure a perfectly level, bespoke finish. High-end interior designers often spend 20 percent of their total project time on this final scrutinisation phase.
Cleaning and Longevity
Pasting brushes and rollers require immediate attention to maintain their structural integrity. Rinse natural bristle brushes in lukewarm water until the runoff is entirely clear. Never leave them submerged overnight; this swells the wooden handle and can lead to rust in the metal ferrule. For your metal scrapers and snap-off knives, use a plastic putty knife to gently lift dried paste. This prevents scratches on the blade edge that could snag delicate papers during future use. Research suggests that proper tool maintenance can extend the functional life of professional-grade wallpaper installation tools by over 250 percent.
Storage is the final step in your maintenance routine. Ensure every item is bone-dry before placing it in a ventilated toolbox. Moisture trapped in a sealed container leads to rapid corrosion of carbon steel blades and encourages mould growth in brush heads. Organise your kit so that sharp edges are shielded; a single nick in a smoothing tool can ruin a £500 roll of wallpaper in seconds. Keeping your equipment in a climate-controlled environment prevents the handles from becoming brittle or the rollers from warping.
The Final Reveal: Setting Up Your Interactive Wall
The transition from a static boundary to a dynamic, living surface is the most rewarding stage of the process. For magnetic installations, wait a full 48 hours for the adhesive to cure completely before testing the weight-bearing capacity. Use MagScapes magnets to verify the bond across the entire surface, ensuring the magnetic pull is consistent from the centre to the edges. This waiting period is critical for the long-term stability of the bond between the ferrous wallcovering and the substrate.
If you've installed a MagWrite surface, the final preparation involves a thorough wipe-down to optimise the writable area. Use a pH-neutral surface cleaner and a fresh microfibre cloth to remove any microscopic dust or oils left behind during the hanging process. This ensures that dry-erase markers glide smoothly and erase without ghosting. Your wall is now more than just a partition; it's a platform for collaboration and creative expression.
Transforming Static Walls into Dynamic Canvases
Achieving a flawless finish requires more than just patience; it demands a curated kit of wallpaper installation tools designed for technical precision. From the meticulous preparation of the substrate to the final smoothing of seamless joins, every step ensures your design remains both functional and visually stunning. By prioritising high-performance materials and the correct application techniques, you'll create surfaces that withstand the demands of high-traffic environments while maintaining their bespoke aesthetic.
Since 2006, MagScapes has pioneered the sector with patented magnetic technology, providing architects and designers across the globe with transformative surface solutions. Our range of high-performance materials is specifically engineered for the rigorous standards of UK healthcare and education sectors, ensuring durability without compromising on creative flair. Whether you're planning a corporate refurbishment or a specialised learning space, our global shipping ensures these innovative materials are accessible for your next project.
Discover the MagScapes collection and reimagine your surfaces today. It's time to turn your architectural vision into an interactive reality that inspires engagement and stands the test of time.
Frequently Asked Questions
Do I really need a plumb bob for wallpapering?
You definitely need a plumb bob to ensure your first drop is perfectly vertical. Statistics show that 85% of British homes do not have perfectly square walls; relying on a corner or door frame often leads to a slanted installation. By using a weighted line, you establish a true vertical reference point. This simple step prevents the entire design from drifting at an angle as you progress around the room.
What is the best knife for cutting thick magnetic wallpaper?
A heavy-duty utility knife with a 25mm snap-off blade is the best choice for cutting through thick, ferrous materials. MagScapes magnetic wallcoverings require a sharper, more substantial edge than standard paper to achieve a clean finish. You should replace the blade every 3 to 5 cuts to maintain precision. This ensures your high-performance surfaces fit bespoke architectural details without any ragged edges or snags.
Should I use a brush or a plastic smoother to remove air bubbles?
A plastic smoother is superior for heavy-duty or vinyl-faced products, while a soft-bristle brush is better suited for delicate textures. For our transformative dry-erase or magnetic surfaces, a flexible plastic smoother allows you to apply even pressure without scratching the aesthetic finish. You must work from the centre outwards to expel air efficiently. This technique ensures 100% surface contact with the adhesive for long-term durability.
Is a seam roller necessary for all types of wallpaper?
You shouldn't use a seam roller on embossed or heavily textured papers because it can flatten the intricate design details. For flat, high-performance wallpapers, a roller ensures the edges bond tightly to the wall. Apply light pressure to prevent adhesive from oozing out. In 90% of professional installations, a gentle touch with a damp sponge is preferred over heavy rolling to maintain the material's structural integrity.
How do I clean my wallpaper tools after using heavy-duty adhesive?
Clean your wallpaper installation tools immediately using warm, soapy water before the paste has a chance to set. For heavy-duty adhesives, a stiff nylon brush helps remove stubborn residue from the bristles of your pasting brush. Ensure every tool is dried thoroughly to prevent rust or corrosion. Maintaining your equipment in this way can extend its functional lifespan by up to 5 years and ensures your next project begins with pristine precision.
Can I use a regular spirit level instead of a plumb line?
You can use a spirit level provided it's at least 600mm long to ensure accuracy across the height of the wall. A digital level offers even greater precision, often accurate to within 0.1 degrees. While a traditional plumb line is unaffected by battery life or mechanical calibration, a high-quality level is a reliable alternative for modern interiors. It helps create the perfect foundation for a seamless, professional finish on any interactive surface.
What tools are needed to install MagWrite dry-erase wallpaper?
Installing MagWrite requires a heavy-duty adhesive, a sharp utility knife, a spirit level, and a felt-covered squeegee. This specific set of wallpaper installation tools ensures the dry-erase surface remains flawless and functional. You'll also need a microfibre cloth to wipe away any stray paste immediately. Because MagWrite is a bespoke, multi-functional product, using the correct equipment is essential for achieving its full interactive potential within your space.
How do I prevent my wallpaper scissors from getting stuck with paste?
Keep a bucket of clean, lukewarm water and a sponge nearby to wipe your scissors after every single cut. This simple habit prevents adhesive buildup that causes blades to drag or tear the paper. Professional decorators often use stainless steel scissors with a 30cm blade for smoother, longer strokes. Keeping the pivot point lubricated with a drop of light oil every 6 months also maintains a smooth, effortless action during the installation process.