


Table of Contents
- Preparation and Wall Surface Requirements
- How to Prepare Walls for Magnetic Wallpaper
- Essential Tools and Materials for Installation
- Step-by-Step Installation Process
- Magnetic Wallcovering vs Magnetic Paint: Key Differences
- Testing Magnet Compatibility and Performance
- Maintenance, Cleaning, and Durability
- Conclusion
Last Updated: August 10, 2026
Preparation and Wall Surface Requirements
Installing magnetic wallcovering requires meticulous surface preparation. Your wall's condition determines whether the installation will succeed or fail. A poorly prepared surface leads to bubbles, peeling edges, and magnets that won't hold securely. The good news: proper preparation is straightforward if you follow the right steps.
Assessing Your Wall Condition
Before you touch any adhesive, examine your wall carefully. Run your hand across the surface to identify imperfections. Look for cracks, dents, flaking paint, or areas where the existing wallcovering is lifting. These defects will telegraph through your magnetic wallcovering, creating visible bumps and weak adhesion points.
Check whether your wall is absorbent or sealed. Press a damp cloth against the surface for five seconds. If water soaks in, you have an absorbent substrate like plaster or raw drywall. If water beads up, your wall is sealed, possibly painted with gloss or semi-gloss, or covered with vinyl. This distinction matters because it determines which adhesive you'll need. MagScapes offers two formulations: MagFix™ for absorbent surfaces and MagVOV™ for non-absorbent surfaces, each engineered for different substrates.

Also inspect for moisture. Press a moisture meter against the wall if you have one, or simply observe whether the wall feels damp. Magnetic wallcovering won't adhere properly to wet or damp substrates. If your wall feels moist, allow it to dry completely before proceeding, this may take several weeks in humid conditions.
Cleaning and Priming
Clean your wall thoroughly with a dry cloth first, removing dust, cobwebs, and loose debris. Then wash the surface with a damp cloth and mild detergent. For walls with stubborn stains or grease, use a sugar soap solution, this is the standard preparation in UK facilities management. Rinse with clean water and allow the wall to dry completely.
Once dry, assess whether your wall needs primer. If you're installing over bare plaster or new drywall, primer is essential. It seals the absorbent substrate and prevents the wall from sucking moisture out of the adhesive too quickly, which would cause weak bonding. For previously painted walls in good condition, primer is optional but recommended for maximum adhesion. Apply primer according to manufacturer instructions and allow full drying time, typically 24 hours.
How to Prepare Walls for Magnetic Wallpaper
Proper wall preparation separates amateur installations from professional results. This step is where most DIY attempts falter. Teams that skip or rush this phase consistently report bubbling, seam separation, and magnets that lose grip within months.
Repairing Damaged Drywall
Inspect your drywall for damage. Small nail holes and minor dents can be filled with spackling compound. For larger cracks or gouges, use joint compound applied with a putty knife. Allow the compound to dry, then sand smooth with fine-grit sandpaper. Wipe away dust with a damp cloth and allow to dry.
For significant damage, large holes or water damage, you may need to patch or replace sections of drywall. Cut out the damaged area in a rectangular shape, then install a new piece of drywall using drywall screws. Apply joint compound over the seams, feather it outward, and sand smooth. This work is labour-intensive, but skipping it will result in visible imperfections showing through your magnetic wallcovering.
Measuring and Planning Your Layout
Measure your wall height and width accurately. Use a laser plumb line to identify the vertical true line, this is critical for keeping your panels straight. Mark this line lightly with a pencil.
Plan your panel layout before you start. Magnetic wallcovering typically comes in rolls. Decide whether you'll run panels horizontally or vertically, and where seams will fall. If your wall width doesn't divide evenly by panel width, plan to trim the final panel. It's better to have a small trimmed panel on one side than to create uneven seams throughout.

For walls with windows or doors, measure carefully and plan your panels to minimize cutting around obstacles. Cutting around complex shapes is time-consuming and increases the risk of wrinkles and air bubbles.
Essential Tools and Materials for Installation
Gather these items before you begin. Having everything ready prevents interruptions and keeps the adhesive from drying while you search for a tool.
Tools you'll need:
- Smoothing tool or squeegee (plastic, not metal)
- Sharp utility knife or wallcovering trimmer
- Measuring tape
- Laser plumb line
- Sponge or cloth for damp application
- Pencil for marking
- Straight edge or level
- Bucket for water or adhesive (depending on your adhesive type)
Materials:
- Magnetic wallcovering (measure your wall and add 10% for waste)
- Wallcovering adhesive suited to your substrate type
- Primer (if your wall is bare plaster or new drywall)
- Joint compound and spackling compound (for repairs)
- Sandpaper (120-grit and 220-grit)
- Drop cloths to protect flooring
For adhesive, MagScapes manufactures two options. The MagFix™ General Adhesive works on absorbent surfaces and costs £22.00 per pot. The MagVOV™ Vinyl On Vinyl Adhesive handles non-absorbent sealed surfaces and costs £33.00 per pot. Both are ready-mixed, which eliminates mixing errors and ensures consistent application.

| Material | Purpose | Notes |
|---|---|---|
| Magnetic wallcovering | Main installation material | Measure wall + 10% waste |
| Adhesive (MagFix or MagVOV) | Bonds covering to wall | Choose based on substrate type |
| Primer | Seals absorbent surfaces | Essential for plaster or new drywall |
| Smoothing tool | Removes air bubbles | Use plastic, not metal |
| Utility knife | Trims edges and seams | Keep blade sharp for clean cuts |
Step-by-Step Installation Process
This section walks you through the actual installation. The process is methodical but not complicated. Most DIY installers complete a standard bedroom wall in 4-6 hours, though your timeline depends on wall condition and panel complexity.
Step 1: Apply Adhesive to the Wall
Start with a small section, roughly one panel at a time. Do not apply adhesive to the entire wall at once; it will dry before you finish positioning the covering.
Pour your adhesive into a clean bucket. Using a paint roller or brush, apply adhesive evenly across the wall section. The adhesive should be wet but not dripping. A common mistake is applying too little adhesive, which creates weak bonding and bubbles. Apply enough that the adhesive is visible across the entire surface.
Work in a methodical pattern. If you're right-handed, start at the top left and work downward and rightward. This prevents you from brushing against wet adhesive with your body or arms.
Step 2: Position and Align the First Panel
Unroll your first panel and position it at the top of your marked vertical line. Use your laser plumb line to ensure the panel's edge aligns perfectly with vertical. This first panel sets the tone for the entire installation, if it's crooked, every subsequent panel will be off.
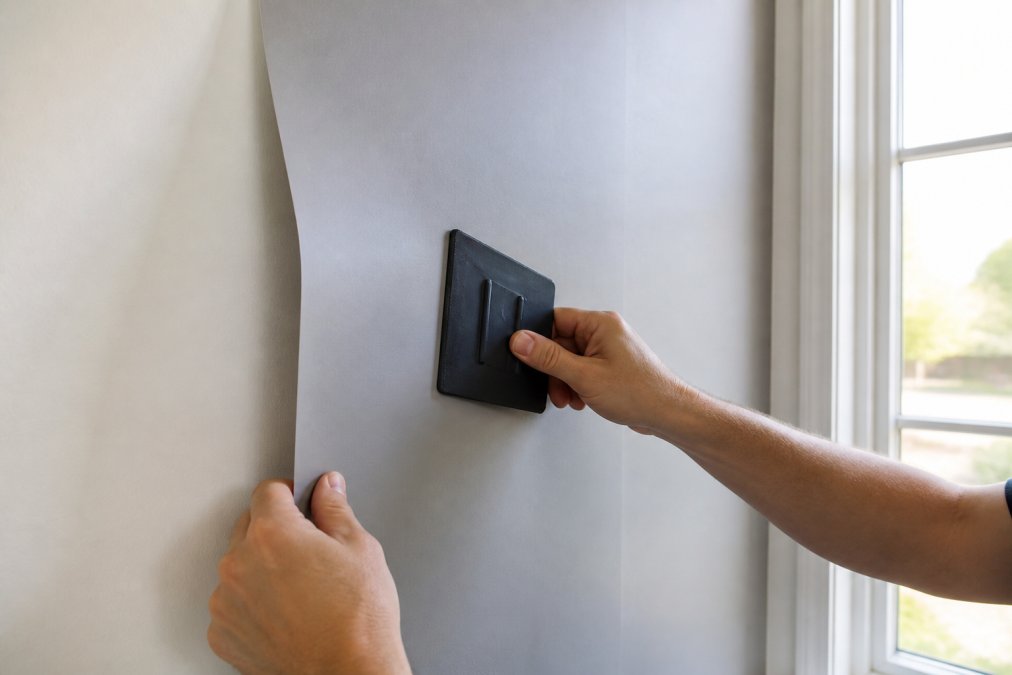
Press the panel into the adhesive at the top, then gradually work downward, smoothing as you go. Don't let the entire panel drop into place at once; this traps air and creates bubbles. Instead, press and smooth in overlapping motions, working from top to bottom and from the center outward toward the edges.
Step 3: Smooth Out Air Bubbles and Wrinkles
Air bubbles are the enemy. They weaken adhesion and look unprofessional. Use your smoothing tool to push air out toward the edges. Work in overlapping strokes, always moving toward the perimeter of the panel.
For stubborn bubbles, you have two options. First, try smoothing harder with more pressure. Second, use a small syringe to inject adhesive into the bubble from behind (this requires carefully lifting the edge), then smooth again. Most bubbles disappear with firm, consistent smoothing.
Wrinkles typically indicate misalignment. If you notice wrinkles, carefully lift the panel edge and reposition. It's easier to correct now than after the adhesive sets.
Step 4: Trim Edges and Seams
Once a panel is smooth and set, trim the edges. Use a sharp utility knife and a straight edge. Cut along the ceiling line, skirting board, and around any obstacles. Change your blade frequently, a dull blade tears the wallcovering instead of cutting cleanly.
For seams between panels, ensure they're tight and aligned. If overlap exists, cut through both layers with a sharp knife, then remove the excess. The seam should be nearly invisible when done correctly.
Step 5: Install Remaining Panels
Repeat the process for each subsequent panel. Ensure each new panel's edge aligns with the previous panel's edge. Overlap slightly if needed, then trim both layers together for a perfect seam.
Allow adhesive to cure fully before testing magnet adhesion. Curing time varies by adhesive type and environmental conditions, typically 24-48 hours. During this time, avoid touching the wall or hanging magnets.
Magnetic Wallcovering vs Magnetic Paint: Key Differences
Many prospects ask whether they should use magnetic paint instead of magnetic wallcovering. Both create magnet-receptive surfaces, but they differ significantly in application, performance, and longevity.
Magnetic paint contains ferrous particles suspended in paint. You apply it like standard paint using a brush or roller. The process is straightforward, no special skills required. However, magnetic paint has substantial limitations. It requires multiple coats (typically 3-4) to achieve adequate magnetic strength, which extends application time and increases cost. The paint layer is thin and vulnerable to chipping and wear, especially in high-traffic areas or healthcare settings where walls endure frequent contact. Magnetic paint also doesn't provide a finished aesthetic, you typically paint over it with standard paint, adding another step.
Magnetic wallcovering, by contrast, is a pre-manufactured sheet material that combines a ferrous layer with a finished surface. It installs in one step and provides immediate, durable magnetic receptivity. The surface is designed to withstand heavy use, ideal for classrooms, offices, and healthcare facilities. Wallcovering offers superior magnet holding power compared to paint, and the finished surface is more visually sophisticated. MagScapes manufactures premium wallcovering in multiple finishes, including MagLiner™ in Matt Grey and Brown and MagChalk™ with a chalkboard surface, giving you aesthetic flexibility.
The trade-off is installation complexity. Wallcovering requires careful surface preparation and skilled application. Paint is easier for DIYers but delivers inferior long-term performance.
Testing Magnet Compatibility and Performance
Before you load your wall with magnets, verify that your installation works correctly. This step prevents disappointment and identifies any adhesion issues while they're still correctable.
Gather a variety of magnets, standard office magnets, rare earth magnets, and any specialty magnets you plan to use regularly. Test them across different areas of your wall, particularly near seams and edges where adhesion might be weaker.
Rare earth magnets (neodymium magnets) are significantly stronger than standard ferrous magnets. If your application involves heavy items, large whiteboards, metal shelving, or dense documentation, test with the actual magnets you'll use. Weak magnets might hold light items but fail under load.
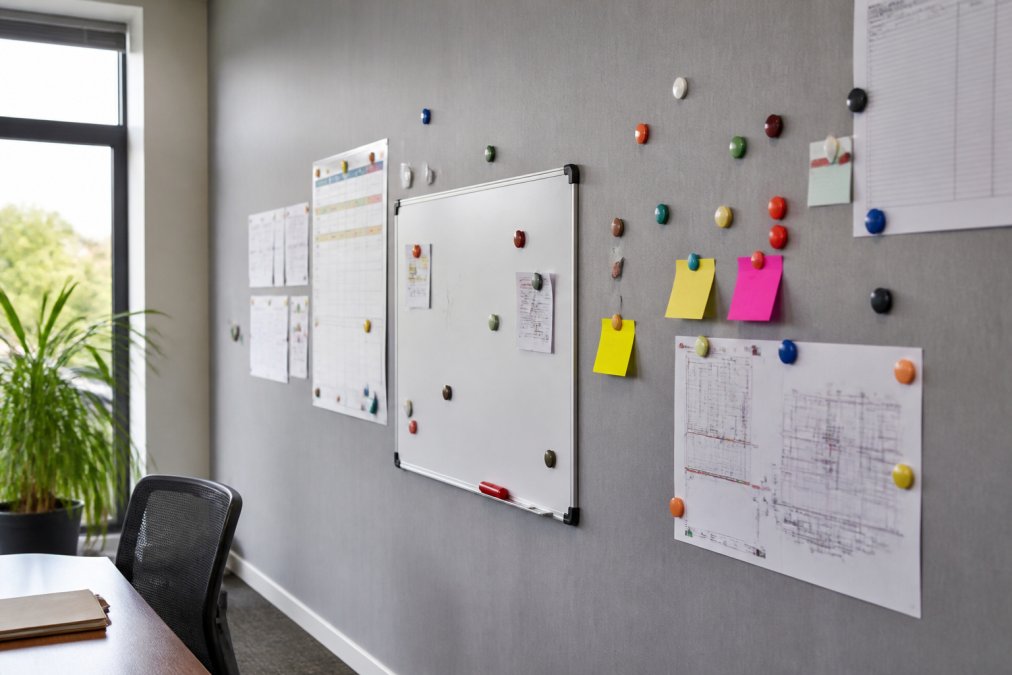
Document your findings. Note which magnet types hold securely, which areas of the wall perform best, and whether any weak spots exist. If you find areas where magnets don't hold reliably, the adhesive may not have set fully, or the wall surface may not be level. Allow additional curing time, or investigate the wall surface in that area.
Maintenance, Cleaning, and Durability
Magnetic wallcovering is durable, but it requires proper care to maintain performance and appearance. Unlike standard wallpaper, it's designed to withstand regular contact and cleaning.
Clean your magnetic wallcovering regularly using a soft, damp cloth and mild detergent. Avoid abrasive sponges or harsh chemicals, which can damage the surface finish. For stubborn marks or stains, use a magic eraser sponge, these work well on most wallcovering finishes without causing damage.
The magnetic properties don't degrade with age. Magnets will continue to hold reliably for years, provided the wallcovering remains properly adhered. If you notice areas where the wallcovering is lifting or peeling, address them immediately. Lift the edge carefully, apply fresh adhesive, and smooth back into place.
Avoid placing extremely heavy items on magnets for extended periods. While the wallcovering is strong, concentrated weight can stress the adhesive bond over time. For healthcare settings or classrooms with heavy daily use, inspect the wallcovering quarterly and reinforce any areas showing signs of wear.
If you need to remove magnetic wallcovering, the process is straightforward. Gently lift a corner and peel back slowly. If the wallcovering resists, apply heat using a hair dryer to soften the adhesive, then continue peeling. Once removed, residual adhesive can be cleaned away with warm water and a cloth. The wall surface underneath will be intact, ready for repainting or new wallcovering.
Installing magnetic wallcovering transforms your walls into functional, interactive surfaces that adapt to your evolving needs. Whether you're creating a collaborative office, an engaging classroom, or a sophisticated home interior, proper installation ensures years of reliable performance. The process requires attention to detail during preparation and methodical execution during application, but the results justify the effort. MagScapes' premium magnetic wallcovering products, combined with the right adhesive and careful installation technique, deliver the professional finish and lasting durability that distinguishes premium magnetic interiors from budget alternatives. Get started with MagScapes and unlock walls that work as hard as your team does.
Frequently Asked Questions
How difficult is it to install magnetic wallcovering yourself?
Installing magnetic wallcovering is manageable for DIYers with basic home improvement experience. The process requires careful wall preparation, proper adhesive application, and attention to alignment, but no specialised skills are needed. Most rooms can be completed in a day or two. The key is taking time with surface preparation and using the correct adhesive, MagFix™ for absorbent surfaces like plaster, or MagVOV™ for sealed surfaces. If your walls are severely damaged or uneven, professional installation may be worth the investment.
Can you paint over magnetic wallcovering?
Yes, you can paint over magnetic wallcovering with standard emulsion or acrylic paint, though this will cover the ferrous surface and reduce magnet visibility. If you want to maintain the magnetic functionality while changing the appearance, consider using magnetic paint as a top coat instead. However, magnetic wallcovering itself is available in multiple finishes (matt, chalkboard, dry-erase), so repainting may not be necessary. Always test paint adhesion on a small hidden area first.
Do magnets stick well to magnetic wallcovering?
Yes, magnets stick securely to magnetic wallcovering because the ferrous liner contains rare earth neodymium properties that create strong magnetic receptivity. Standard refrigerator magnets, office magnets, and heavy-duty rare earth magnets all work effectively. The holding strength depends on the magnet's grade, stronger magnets hold heavier items. Most users find that even standard magnets hold whiteboards, artwork, and notices reliably. You can test compatibility before full installation by placing magnets on a sample panel.
What's the difference between magnetic wallcovering and magnetic paint?
Magnetic wallcovering is a pre-manufactured ferrous-lined wallpaper that installs like traditional wallpaper, offering consistent magnetic strength and a finished appearance immediately. Magnetic paint requires multiple coats, longer curing time, and more labour-intensive application, often taking weeks to reach full strength. Wallcovering is more forgiving of application errors and delivers superior magnet-holding performance. Magnetic paint is cheaper upfront but requires significant preparation and application time. For most installations, wallcovering provides better durability and professional results.
This article was written using GrandRanker